Backup and Recovery
Backup and Recovery 7.1
  • Storware Backup & Recovery documentation
    • Table of Contents
  • Changelog
  • Overview
    • Main Features
    • Storware Backup and Recovery concepts
      • Support Matrix
      • Architecture
      • Components
      • Backup types
      • Typical Scenarios
    • Licensing
    • Product Life Cycle
  • Deployment
    • Component requirements
    • Supported platforms requirements
    • Sizing Guide
      • Small
      • Medium
      • Large
    • Installation
      • ISO-based installation
      • Quick Installation using all-in-one script
      • Installation using Ansible playbook
      • Installation with RPMs
      • Deployment in Microsoft Azure
      • Virtual Appliance
        • RHV/oVirt/OLVM Virtual Appliance
        • Citrix Hypervisor | XCP-ng Virtual Appliance
        • VMware Virtual Appliance
        • Nutanix Acropolis Hypervisor (AHV)
    • Initial Configuration
    • Backup Destinations
      • File System
        • Synthetic File System
          • XFS
          • DD Boost
        • isoLayer (Synthetic)
        • File system
          • Virtual Data Optimizer (VDO)
        • Catalogic Software vStor
      • Deduplication Appliances
        • Dell EMC Data Domain
        • Huawei OceanProtect
        • HPE StoreOnce
        • Exagrid
        • Neverfail HybriStor
      • Object Storage
        • Alibaba Cloud OSS
        • AWS S3 or S3-compatible
        • Ceph Rados Gateway
        • Cloudian S3
        • Wasabi
        • Google Cloud Storage
        • IBM Cloud Object Storage
        • Microsoft Azure Blob Storage
        • Nutanix Objects
        • OpenStack SWIFT
        • Oracle Cloud Infrastructure Object Storage
        • Scality RING
      • Enterprise Backup Providers
        • Dell EMC Avamar
        • Dell EMC Networker
        • IBM Spectrum Protect
        • Micro Focus Data Protector
        • Veritas NetBackup
        • Rubrik Managed Volumes
      • Tape Pools
    • High Availability
      • 2 Node Cluster
      • 3 Node Cluster
    • Common tasks
      • Staging space configuration
      • Enabling HTTPS connectivity for nodes
      • LVM setup on Storware Backup & Recovery Node for disk attachment backup mode
      • Full versions of libvirt/qemu packages installation
      • SSH public key authentication
      • Enabling HTTP(S) Proxy for Storware Backup & Recovery
  • Protecting Virtual Environments
    • Virtual Machines
      • VMware vSphere/ESXi
      • Microsoft Hyper-V
      • Azure Stack HCI
      • Nutanix Acropolis Hypervisor (AHV)
      • Red Hat Openshift Virtualization
      • Red Hat Virtualization
      • oVirt
      • Oracle Linux Virtualization Manager
      • Oracle VM
      • Proxmox VE
      • KVM/Xen
      • OpenStack
      • OpenNebula
      • Virtuozzo
      • Verge
      • Citrix Hypervisor (XenServer)
      • XCP-ng
      • Huawei FusionCompute
      • HPE SimpliVity
      • SC//Platform
    • Cloud
      • Amazon EC2
      • GCP GCE
      • Azure Cloud
    • Containers
      • Kubernetes
      • Red Hat OpenShift
      • Proxmox VE
    • Backup & Restore
    • v2v migration
  • Protecting Microsoft 365
    • Microsoft 365 organization management
      • Configure Microsoft 365 access
      • Add Microsoft 365 organization manually
      • Add Microsoft 365 organization using the Setup Assistant
      • Account auto-synchronization
    • Backup & Restore
    • Suppoted Sharepoint templates, and limitations
  • File Level Backup and Restore - OS Agent
  • Protecting Applications
    • Applications
      • MSSQL
      • MySQL/MariaDB
      • PostgreSQL
      • DB2
      • Oracle
      • Relax and Recover - ReaR
      • Git
      • oVirt/RHV/OLVM
      • Kubernetes/OpenShift etcd
    • Backup & Restore
  • Protecting Storage Providers
    • Storage Providers
      • Ceph RBD
      • Nutanix Files
      • Nutanix Volume Groups
    • Backup & Restore
  • Administration
    • Dashboard
    • Virtual Environments
      • Instances
        • Backup on-demand
        • Restore on-demand
        • Snapshot Management
      • Virtualization Providers
      • Backup SLAs
        • Policies
        • Schedules
      • Snapshot SLAs
        • Policies
        • Schedules
      • Recovery Plans
        • Policies
        • Schedules
      • Mounted Backups (File-level Restore)
    • Storage
      • Instances
        • Backup on-demand
        • Restore on-demand
      • Infrastructure
      • Backup SLAs
        • Policies
        • Schedules
      • Snapshot SLAs
        • Policies
        • Schedules
      • Mounted Backups (File-level Restore)
    • Cloud
      • Instances
      • Service Providers
      • Backup SLAs
        • Policies
        • Schedules
      • Download
    • Applications
      • Instances
      • Execution Configurations
      • Backup SLAs
    • Endpoints
      • Environment
      • Administrators
      • Endpoints Server Management
        • Dashboard
        • Packages
        • Organizations
      • Endpoints Administrator
        • Dashboard
        • Users
          • Local users
          • LDAP users
        • Devices
          • Devices list view
          • Device status
        • Backup SLA
          • Create a Backup SLA
            • GENERAL
            • WINDOWS
            • MAC OS (technical preview)
            • EMAIL CLIENTS
          • Backup SLA management
          • Backup SLA removal
        • Restore Jobs
        • Client Deployments
    • Reporting
      • Virtual Environments
      • Storage
      • Microsoft 365
      • Applications
      • Notifications
      • Audit Log
    • Nodes
      • Instances
      • Node Configurations
    • Access Management
      • Users
      • Groups
      • Roles
      • OS Credentials
    • Settings
      • Global Settings
      • Internal DB Backup
      • Notification Rules
      • Mailing Lists
      • Endpoints Global Settings
    • Upgrade
    • CLI Reference
    • CLI v2 Reference
  • Integration
  • Integration Plugins
    • Red Hat Virtualization UI Plugin
    • oVirt UI Plugin
    • Oracle Linux Virtualization Manager UI Plugin
    • OpenStack UI Plugin
  • Troubleshooting
    • Enable DEBUG mode in Storware Backup and Recovery
    • Collecting logs
    • External log targets
    • Disaster Recovery
  • Known software issues and limitations
  • Glossary
Powered by GitBook
On this page
  1. Deployment
  2. Backup Destinations
  3. Enterprise Backup Providers

Veritas NetBackup

PreviousMicro Focus Data ProtectorNextRubrik Managed Volumes
  • Before we start, you have to generate a token for the clients.

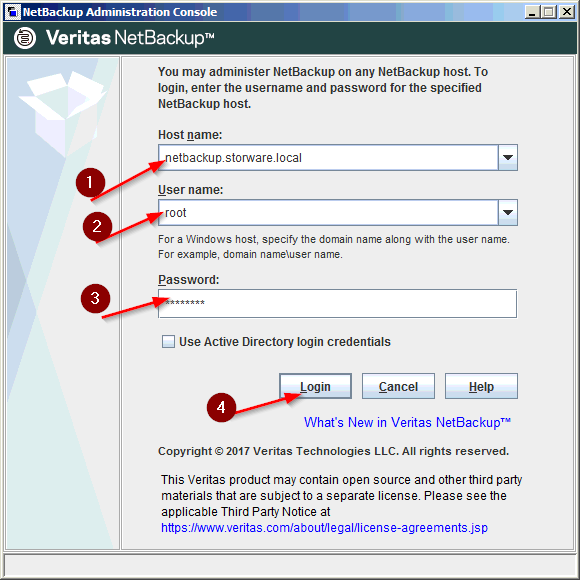
  • To do this, please log in to the Netbackup Administration Console:
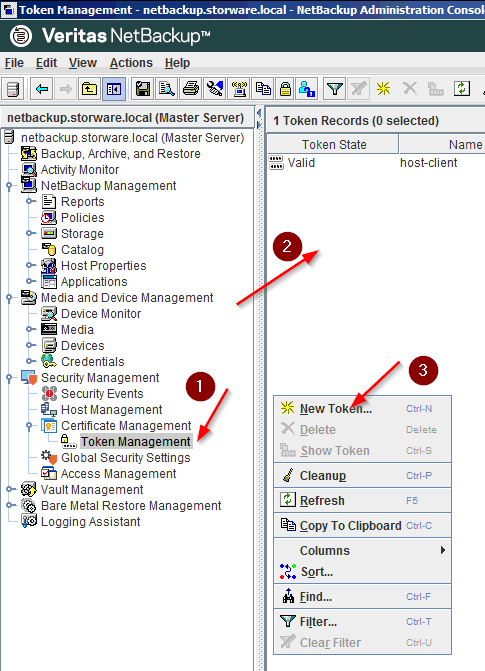
  • After successful login, please click on the “Token Management” submenu under “Certificate Management”. Next, click the right mouse button on the empty space and select “New Token…”.
  • The next step is to generate a token:
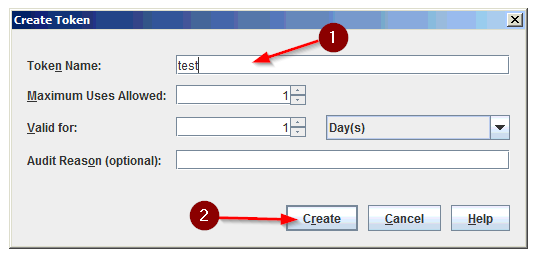
  • Now we must copy the token to the clipboard before we start the installation of the client software.
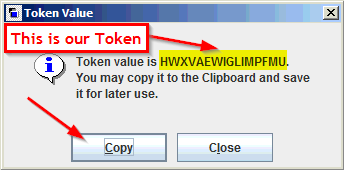
  • To enable Veritas NetBackup support, please download and install Veritas NetBackup Client:

  • Download the CLIENTS1 package for UNIX clients or the CLIENTS2 package for Linux clients to a system with sufficient space.
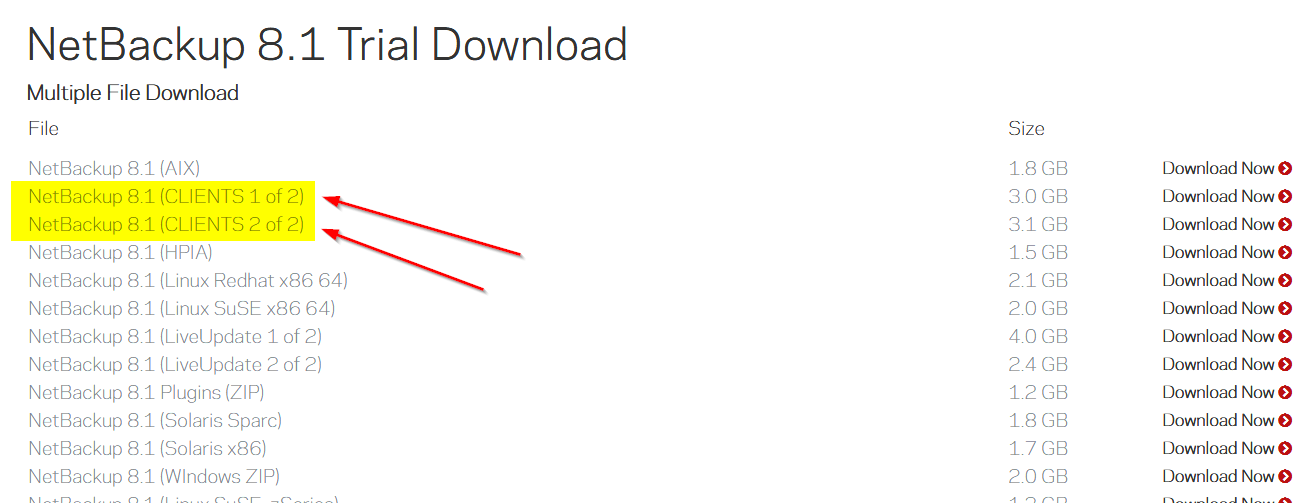
  • Extract the contents of the CLIENTS1 or the CLIENTS2 file.

Example:
     AIX         gunzip NetBackup_8.x_CLIENTS1.tar.gz; tar - xvf NetBackup_8.x_CLIENTS1.tar
     HP-UX        gunzip -dc NetBackup_8.x_CLIENTS1.tar.gz | tar -xvf
     Linux        tar -xzvf NetBackup_8.x_CLIENTS2.tar.gz
     Solaris        tar -xzvf NetBackup_8.x_CLIENTS1.tar.gz
  • Change to the directory for your desired operating system.

 Example:
     AIX, HP-UX, Solaris, Solaris SPARC    cd [path_to_downloaded_tar.gz file]/NetBackup_8.x_CLIENTS1
     Linux, Linux - s390x            cd [path_to_downloaded_tar.gz file]/NetBackup_8.x_CLIENTS2
  • Type ./install and answer the questions as follows

  • When the following message appears, press Enter to continue:
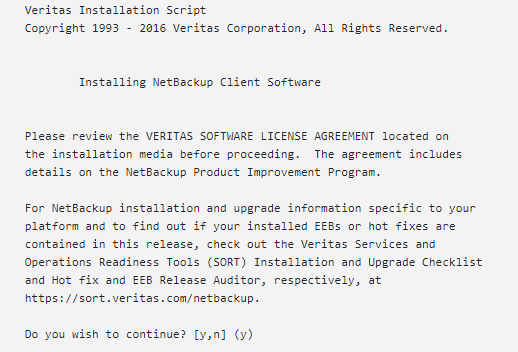
The client binaries represent the operating system versions where the binaries were compiled. The binaries typically function perfectly on later versions of the operating system. The installation procedure attempts to load the appropriate binaries for your system. If the script does not recognize the local operating system, it presents choices.

  • Type y and press Enter to continue with the software installation.

  • Type the FQDN name of your NetBackup master server (for example NetBackup.organization.local) and press Enter to continue.

  • Confirm the NetBackup client name and press Enter to continue.

  • (Conditional) Enter one or more media servers if prompted

  • After you confirm you want to continue, the installer fetches the authority certificate details.

Note: Be aware that if you press Ctrl+C, this action requires you to rerun the installation or continue with the installation without the required security components. If these security components are absent, backups and restores fail.

  • When prompted, review the fingerprint information and confirm that it is accurate.
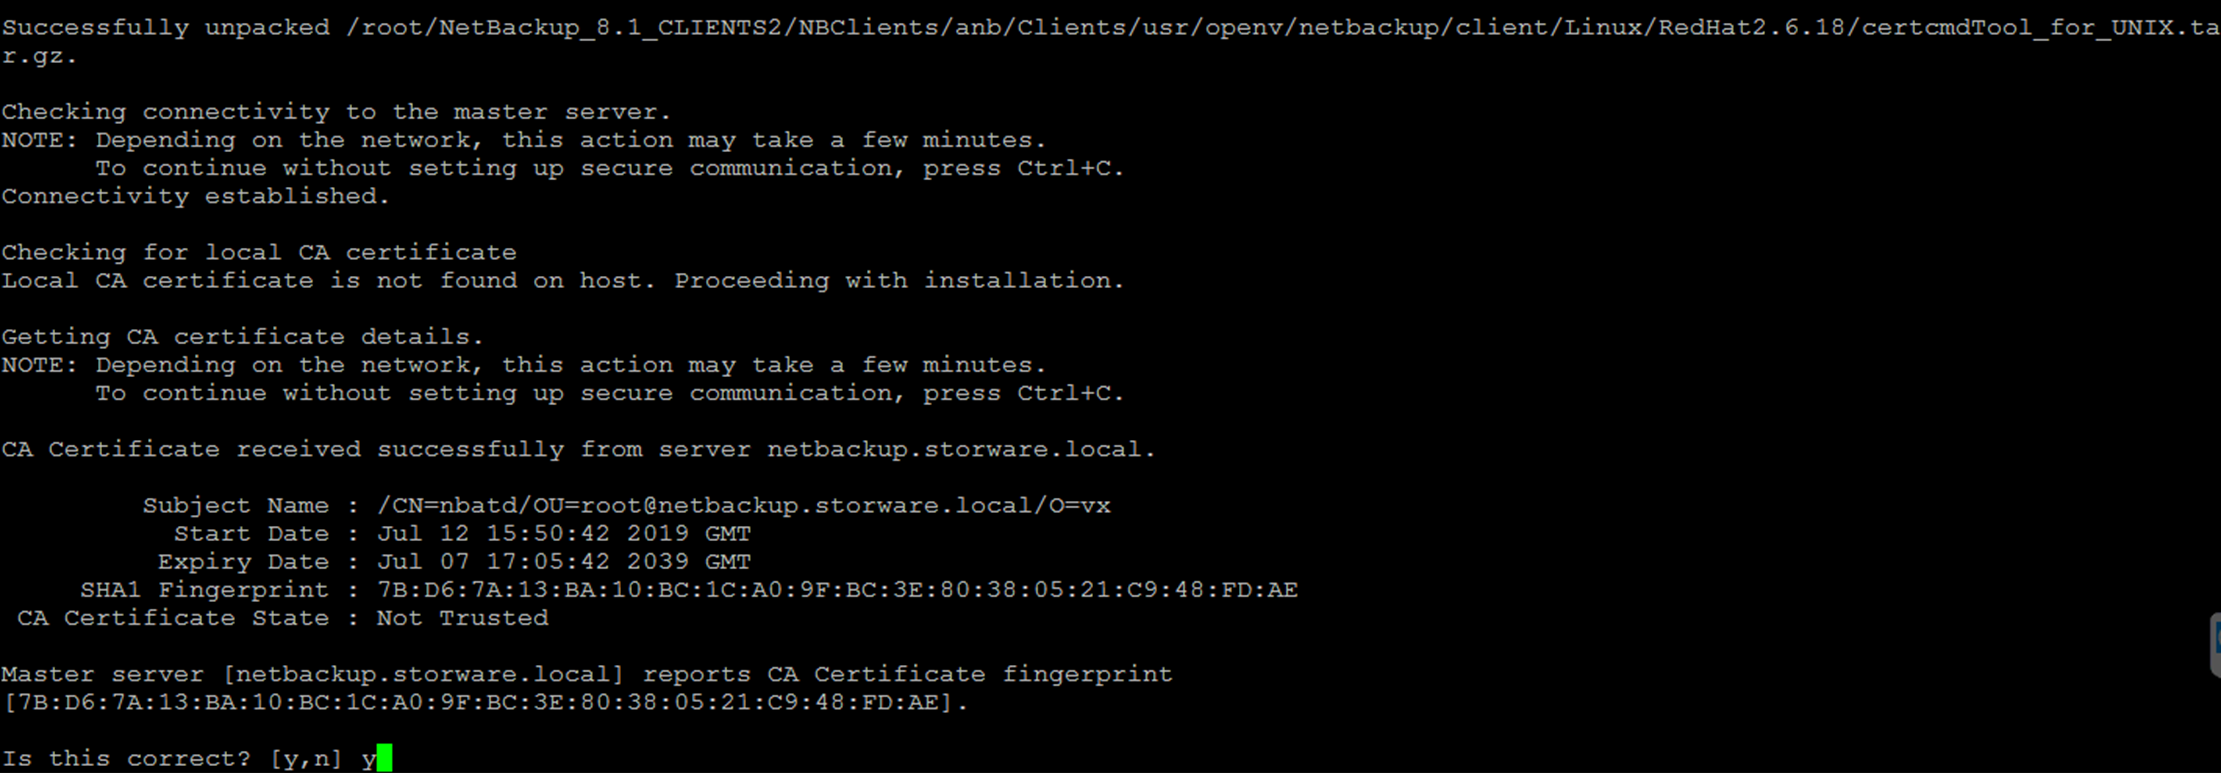
  • After you have confirmed the fingerprint information, the installer stores the authority certificate details.

Note: Be aware that if you press Ctrl+C, this action requires you to rerun the installation or continue with the installation without the required security components. If these security components are absent, backups and restores fail.

  • After the authority certificate is stored, the installer fetches the host certificate.

Note: Be aware that if you press Ctrl+C, this action requires you to rerun the installation or continue with the installation without the required security components. If these security components are absent, backups and restores fail.

  • (Conditional) If prompted for the Authorization Token, please enter it.

The token format is 16 upper case letters. Be aware that if you press Ctrl+C, this action requires you to rerun the installation or continue with the installation without the required security components. If these security components are absent, backups and restores fail.

  • This is the last question. Next, the setup will carry out some operations, after which it will finish its work and exit.
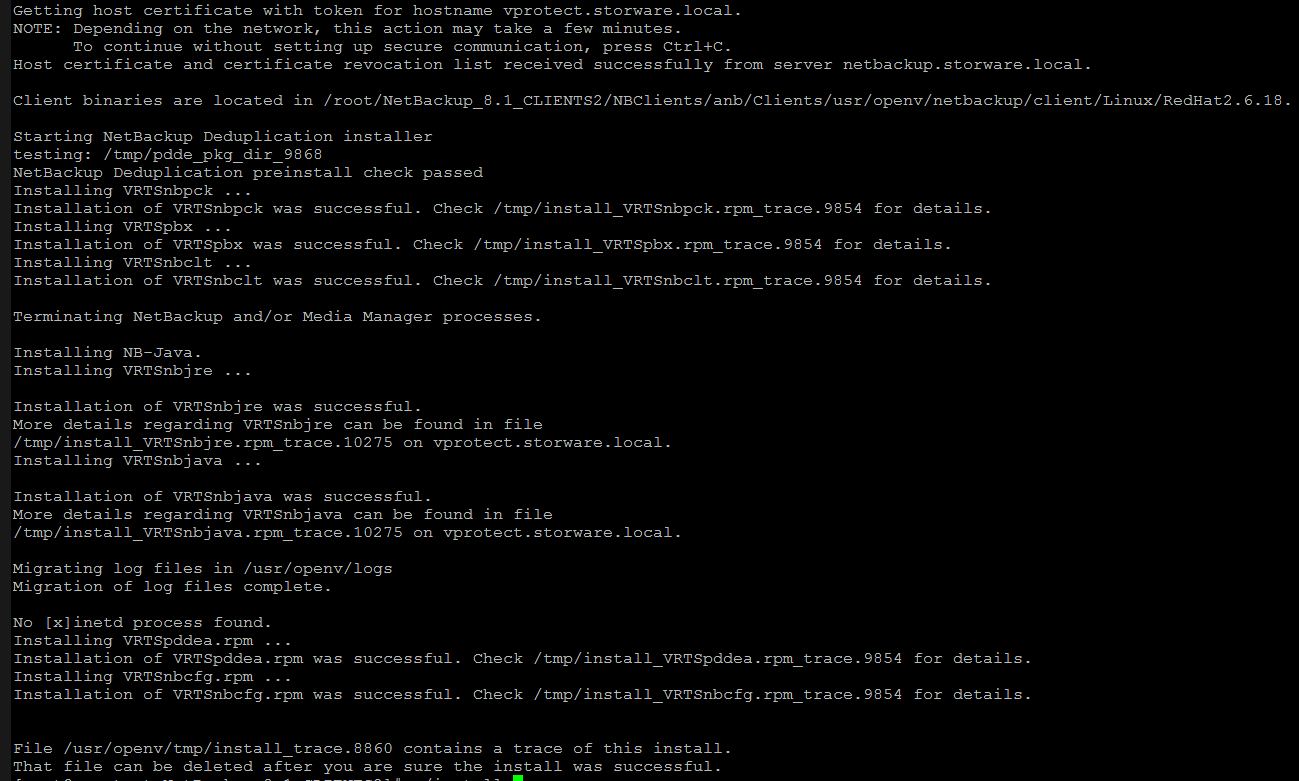
  • Once we have finished the installation of the client software, we need to modify the firewall service to allow two-way communication between the server and our client. We need to allow input communication on ports 13724/tcp, 13724/udp, 1556/tcp and 1556/udp. To do this, enter the commands as below:

  • First, we need to know what our default zone is:

firewall-cmd --get-default-zone
[root@vpro43-vmware ~]# firewall-cmd --get-default-zone
public
firewall-cmd --get-active-zones
[root@vpro43-vmware ~]# firewall-cmd --get-active-zones
public
  interfaces: ens192
firewall-cmd --list-all
[root@vpro43-vmware ~]# firewall-cmd --list-all
public (active)
  target: default
  icmp-block-inversion: no
  interfaces: ens192
  sources: 
  services: cockpit dhcpv6-client iscsi-target mountd nfs rpc-bind ssh
  ports: 8181/tcp 16001-16999/tcp 8080/tcp
  protocols: 
  forward: no
  masquerade: no
  forward-ports: 
  source-ports: 
  icmp-blocks: 
  rich rules: 
	rule family="ipv4" forward-port port="443" protocol="tcp" to-port="8181"
  • As we can see, there is no permission for these ports, so we need to open them and restart the firewall.

firewall-cmd --zone=public --permanent --add-port=13724/tcp && firewall-cmd --zone=public --permanent --add-port=13724/udp

firewall-cmd --zone=public --permanent --add-port=1556/tcp && firewall-cmd --zone=public --permanent --add-port=1556/udp

firewall-cmd --complete-reload
  • Now we can check the status of our firewall:

firewall-cmd --zone=public --permanent --list-ports && firewall-cmd --list-all
[root@vpro43-vmware ~]# firewall-cmd --zone=public --permanent --list-ports && firewall-cmd --list-all
1556/tcp 8080/tcp 8181/tcp 13724/tcp 16001-16999/tcp 1556/udp 13724/udp
public (active)
  target: default
  icmp-block-inversion: no
  interfaces: ens192
  sources: 
  services: cockpit dhcpv6-client iscsi-target mountd nfs rpc-bind ssh
  ports: 8181/tcp 16001-16999/tcp 8080/tcp 13724/tcp 13724/udp 1556/tcp 1556/udp
  protocols: 
  forward: no
  masquerade: no
  forward-ports: 
  source-ports: 
  icmp-blocks: 
  rich rules: 
	rule family="ipv4" forward-port port="443" protocol="tcp" to-port="8181"
  • The last action is to bind the port to the NetBackup client "deamon bpnd”. To do this, type the following command in the terminal.

/usr/openv/netbackup/bin/bpcd -port 13724
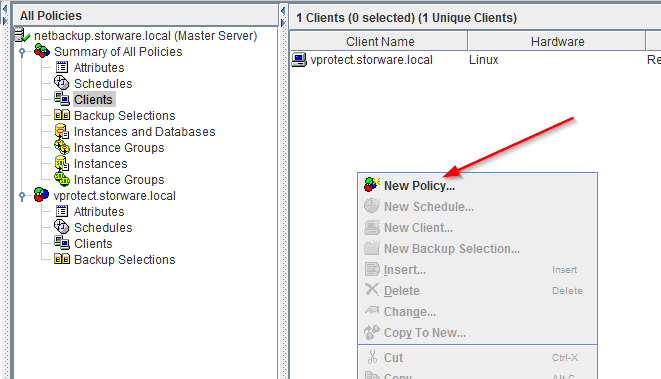
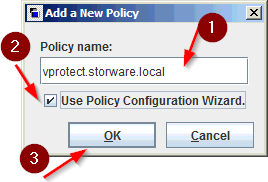
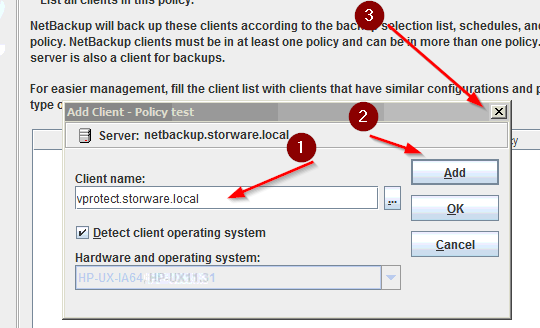
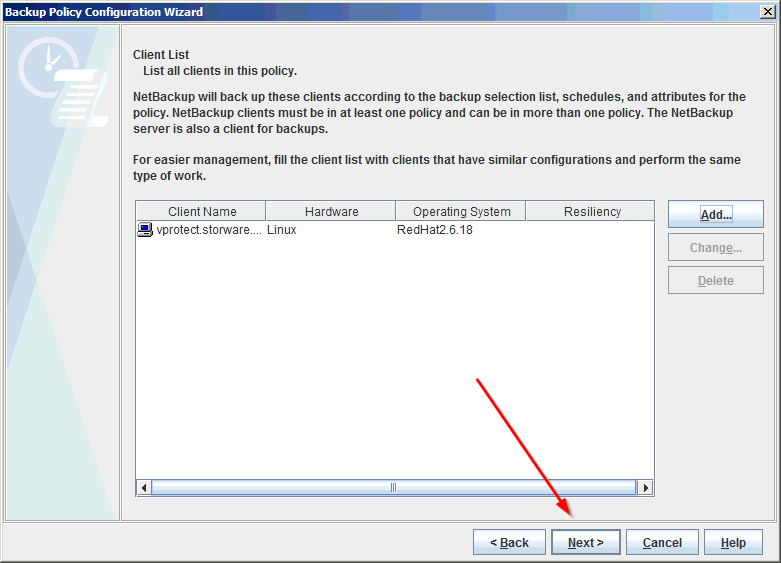
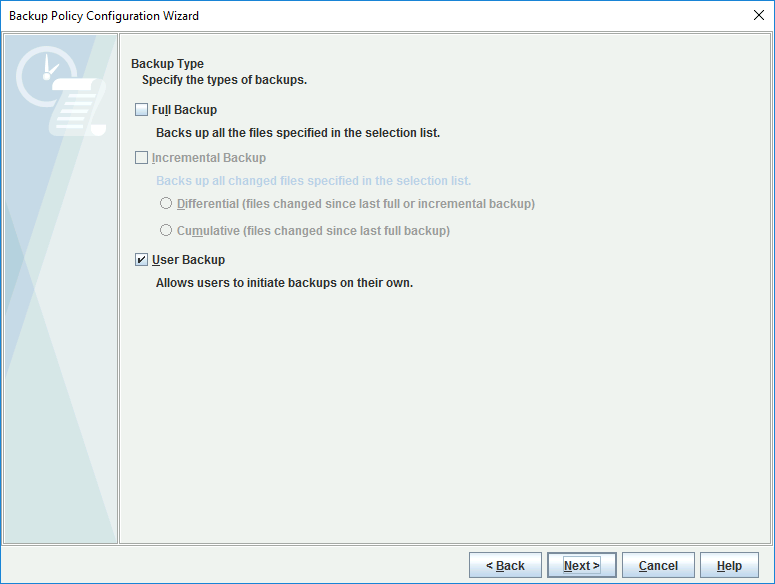
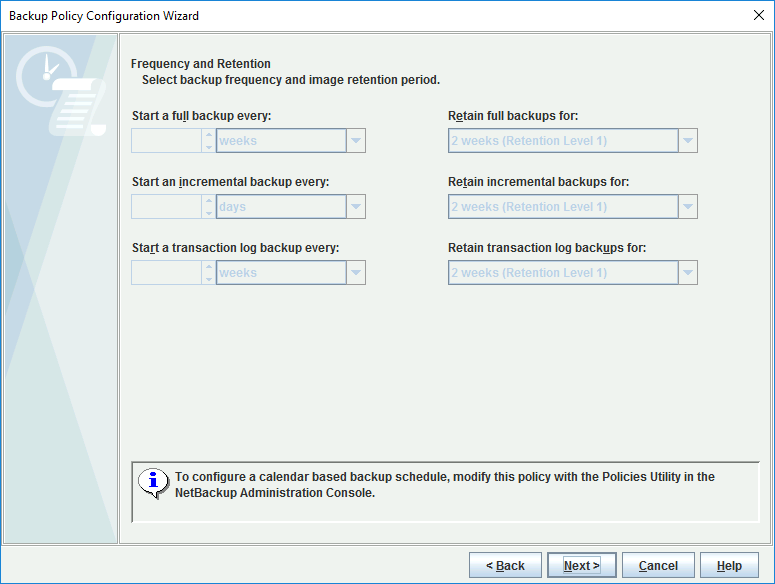
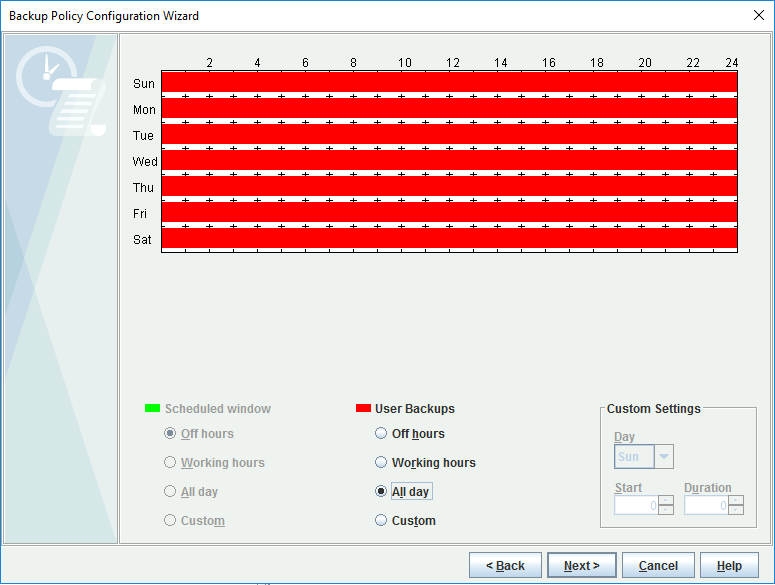
  • To add a new client, we need to create a policy rule for it where we will configure the type and schedule of this client backup. The client will be added automatically after the creator finishes.

Add a new Policy:
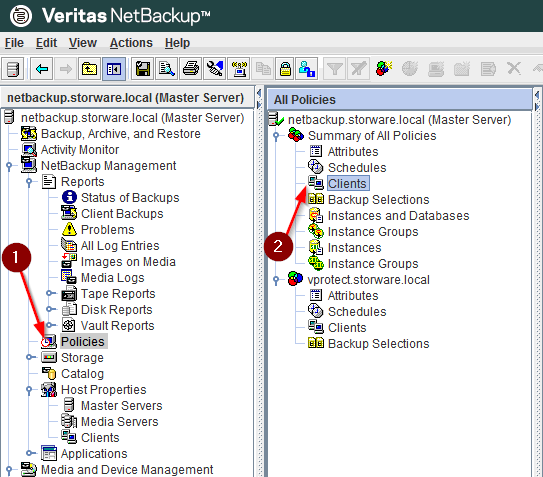
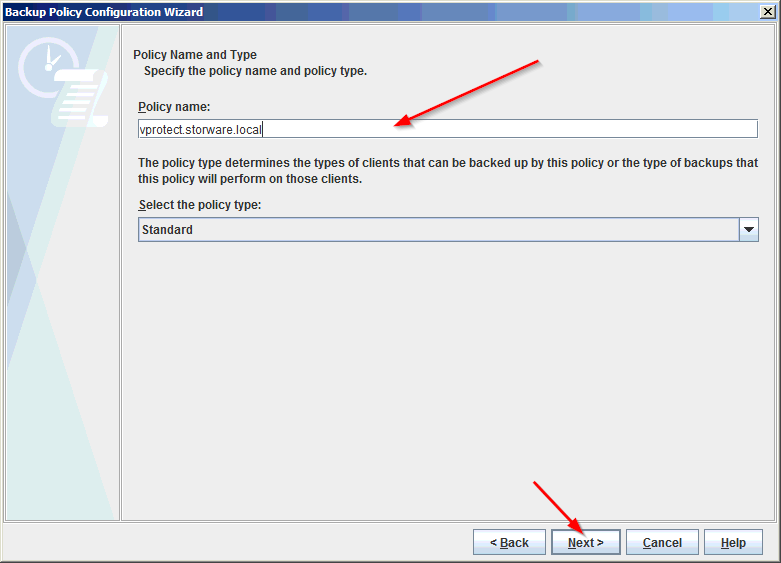
  • Select the type of machine to back up:
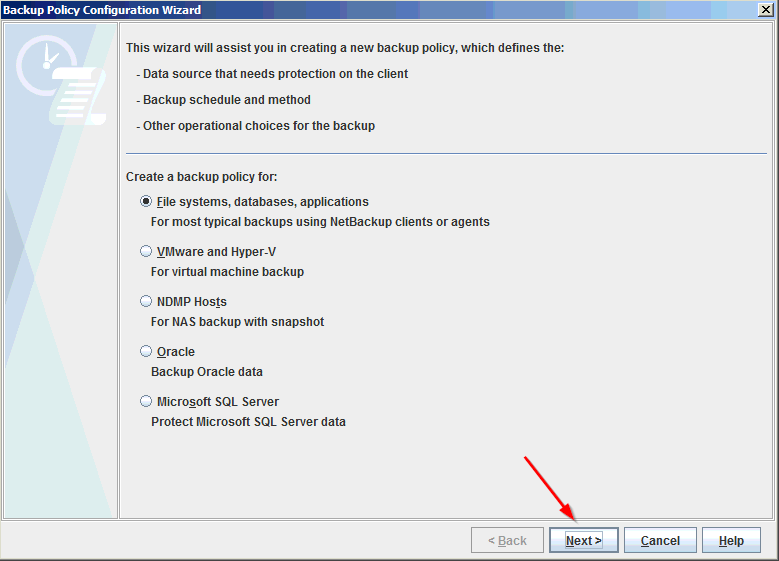
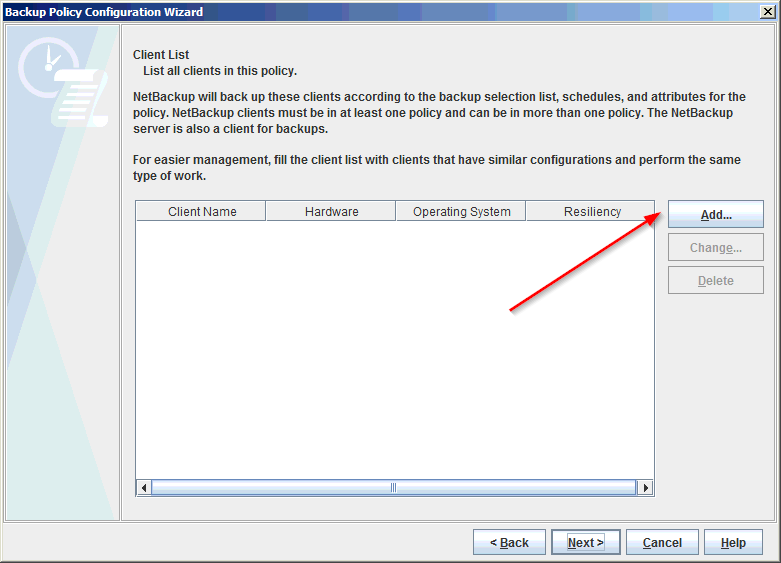
  • Add the client to back up:

  • Set up the configuration details according to your requirements:
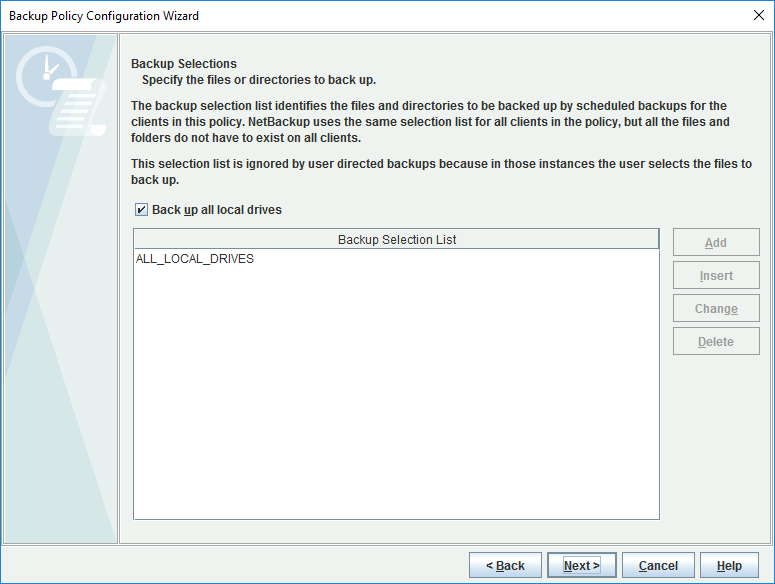
  • We now have the client connected to the server.
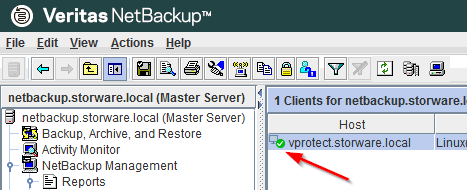
  • Allow manual backup for the Storware Backup & Recovery node client on the Netbackup server.

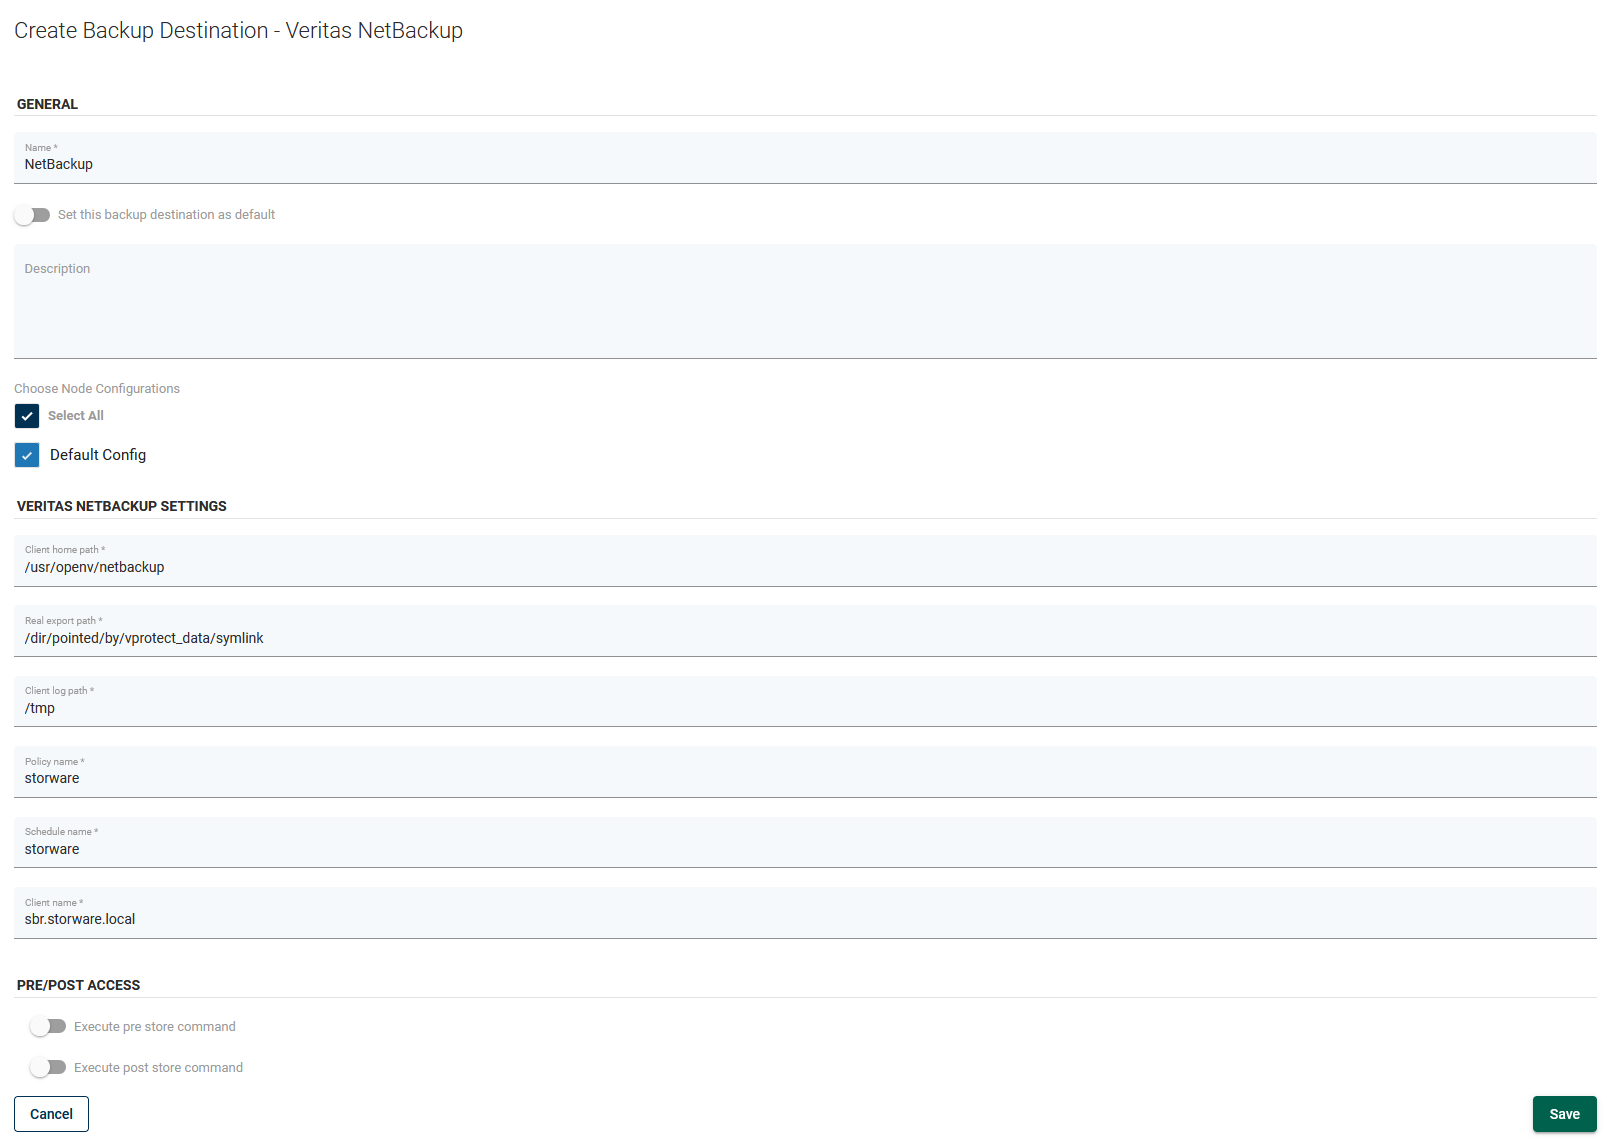
  • Log in to Storware Backup & Recovery, go to "Backup Destinations" and select the "enterprise" sub-tab. Click on "Create Backup Destination" and choose "Veritas Netbackup". Type the name for the new backup destination, client home path, and real export path. Finally, set the Netbackup parameters:

Client home path Real export path Policy Name Schedule name Client name