Backup and Recovery
Backup and Recovery 7.1
  • Storware Backup & Recovery documentation
    • Table of Contents
  • Changelog
  • Overview
    • Main Features
    • Storware Backup and Recovery concepts
      • Support Matrix
      • Architecture
      • Components
      • Backup types
      • Typical Scenarios
    • Licensing
    • Product Life Cycle
  • Deployment
    • Component requirements
    • Supported platforms requirements
    • Sizing Guide
      • Small
      • Medium
      • Large
    • Installation
      • ISO-based installation
      • Quick Installation using all-in-one script
      • Installation using Ansible playbook
      • Installation with RPMs
      • Deployment in Microsoft Azure
      • Virtual Appliance
        • RHV/oVirt/OLVM Virtual Appliance
        • Citrix Hypervisor | XCP-ng Virtual Appliance
        • VMware Virtual Appliance
        • Nutanix Acropolis Hypervisor (AHV)
    • Initial Configuration
    • Backup Destinations
      • File System
        • Synthetic File System
          • XFS
          • DD Boost
        • isoLayer (Synthetic)
        • File system
          • Virtual Data Optimizer (VDO)
        • Catalogic Software vStor
      • Deduplication Appliances
        • Dell EMC Data Domain
        • Huawei OceanProtect
        • HPE StoreOnce
        • Exagrid
        • Neverfail HybriStor
      • Object Storage
        • Alibaba Cloud OSS
        • AWS S3 or S3-compatible
        • Ceph Rados Gateway
        • Cloudian S3
        • Wasabi
        • Google Cloud Storage
        • IBM Cloud Object Storage
        • Microsoft Azure Blob Storage
        • Nutanix Objects
        • OpenStack SWIFT
        • Oracle Cloud Infrastructure Object Storage
        • Scality RING
      • Enterprise Backup Providers
        • Dell EMC Avamar
        • Dell EMC Networker
        • IBM Spectrum Protect
        • Micro Focus Data Protector
        • Veritas NetBackup
        • Rubrik Managed Volumes
      • Tape Pools
    • High Availability
      • 2 Node Cluster
      • 3 Node Cluster
    • Common tasks
      • Staging space configuration
      • Enabling HTTPS connectivity for nodes
      • LVM setup on Storware Backup & Recovery Node for disk attachment backup mode
      • Full versions of libvirt/qemu packages installation
      • SSH public key authentication
      • Enabling HTTP(S) Proxy for Storware Backup & Recovery
  • Protecting Virtual Environments
    • Virtual Machines
      • VMware vSphere/ESXi
      • Microsoft Hyper-V
      • Azure Stack HCI
      • Nutanix Acropolis Hypervisor (AHV)
      • Red Hat Openshift Virtualization
      • Red Hat Virtualization
      • oVirt
      • Oracle Linux Virtualization Manager
      • Oracle VM
      • Proxmox VE
      • KVM/Xen
      • OpenStack
      • OpenNebula
      • Virtuozzo
      • Verge
      • Citrix Hypervisor (XenServer)
      • XCP-ng
      • Huawei FusionCompute
      • HPE SimpliVity
      • SC//Platform
    • Cloud
      • Amazon EC2
      • GCP GCE
      • Azure Cloud
    • Containers
      • Kubernetes
      • Red Hat OpenShift
      • Proxmox VE
    • Backup & Restore
    • v2v migration
  • Protecting Microsoft 365
    • Microsoft 365 organization management
      • Configure Microsoft 365 access
      • Add Microsoft 365 organization manually
      • Add Microsoft 365 organization using the Setup Assistant
      • Account auto-synchronization
    • Backup & Restore
    • Suppoted Sharepoint templates, and limitations
  • File Level Backup and Restore - OS Agent
  • Protecting Applications
    • Applications
      • MSSQL
      • MySQL/MariaDB
      • PostgreSQL
      • DB2
      • Oracle
      • Relax and Recover - ReaR
      • Git
      • oVirt/RHV/OLVM
      • Kubernetes/OpenShift etcd
    • Backup & Restore
  • Protecting Storage Providers
    • Storage Providers
      • Ceph RBD
      • Nutanix Files
      • Nutanix Volume Groups
    • Backup & Restore
  • Administration
    • Dashboard
    • Virtual Environments
      • Instances
        • Backup on-demand
        • Restore on-demand
        • Snapshot Management
      • Virtualization Providers
      • Backup SLAs
        • Policies
        • Schedules
      • Snapshot SLAs
        • Policies
        • Schedules
      • Recovery Plans
        • Policies
        • Schedules
      • Mounted Backups (File-level Restore)
    • Storage
      • Instances
        • Backup on-demand
        • Restore on-demand
      • Infrastructure
      • Backup SLAs
        • Policies
        • Schedules
      • Snapshot SLAs
        • Policies
        • Schedules
      • Mounted Backups (File-level Restore)
    • Cloud
      • Instances
      • Service Providers
      • Backup SLAs
        • Policies
        • Schedules
      • Download
    • Applications
      • Instances
      • Execution Configurations
      • Backup SLAs
    • Endpoints
      • Environment
      • Administrators
      • Endpoints Server Management
        • Dashboard
        • Packages
        • Organizations
      • Endpoints Administrator
        • Dashboard
        • Users
          • Local users
          • LDAP users
        • Devices
          • Devices list view
          • Device status
        • Backup SLA
          • Create a Backup SLA
            • GENERAL
            • WINDOWS
            • MAC OS (technical preview)
            • EMAIL CLIENTS
          • Backup SLA management
          • Backup SLA removal
        • Restore Jobs
        • Client Deployments
    • Reporting
      • Virtual Environments
      • Storage
      • Microsoft 365
      • Applications
      • Notifications
      • Audit Log
    • Nodes
      • Instances
      • Node Configurations
    • Access Management
      • Users
      • Groups
      • Roles
      • OS Credentials
    • Settings
      • Global Settings
      • Internal DB Backup
      • Notification Rules
      • Mailing Lists
      • Endpoints Global Settings
    • Upgrade
    • CLI Reference
    • CLI v2 Reference
  • Integration
  • Integration Plugins
    • Red Hat Virtualization UI Plugin
    • oVirt UI Plugin
    • Oracle Linux Virtualization Manager UI Plugin
    • OpenStack UI Plugin
  • Troubleshooting
    • Enable DEBUG mode in Storware Backup and Recovery
    • Collecting logs
    • External log targets
    • Disaster Recovery
  • Known software issues and limitations
  • Glossary
Powered by GitBook
On this page
  1. Deployment
  2. Backup Destinations
  3. Enterprise Backup Providers

Dell EMC Avamar

PreviousEnterprise Backup ProvidersNextDell EMC Networker

To integrate Storware Backup & Recovery with Dell EMC Avamar, complete the following on Storware Backup & Recovery Node:

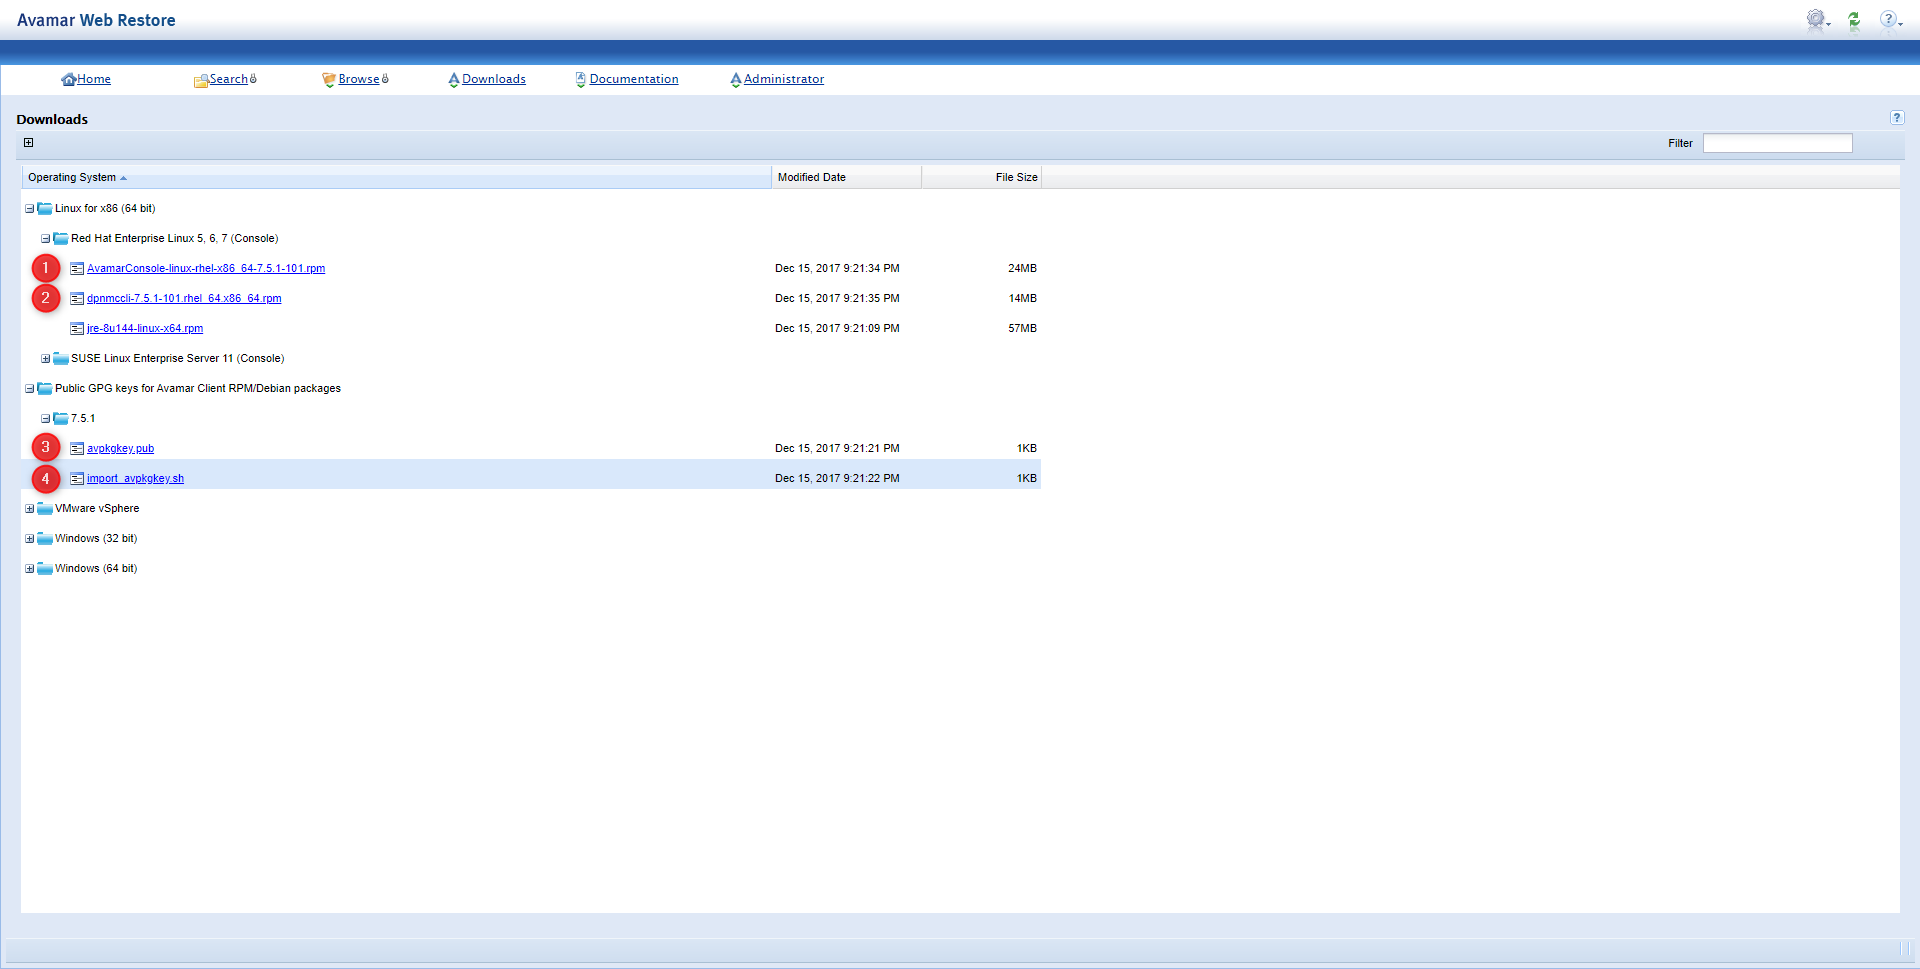
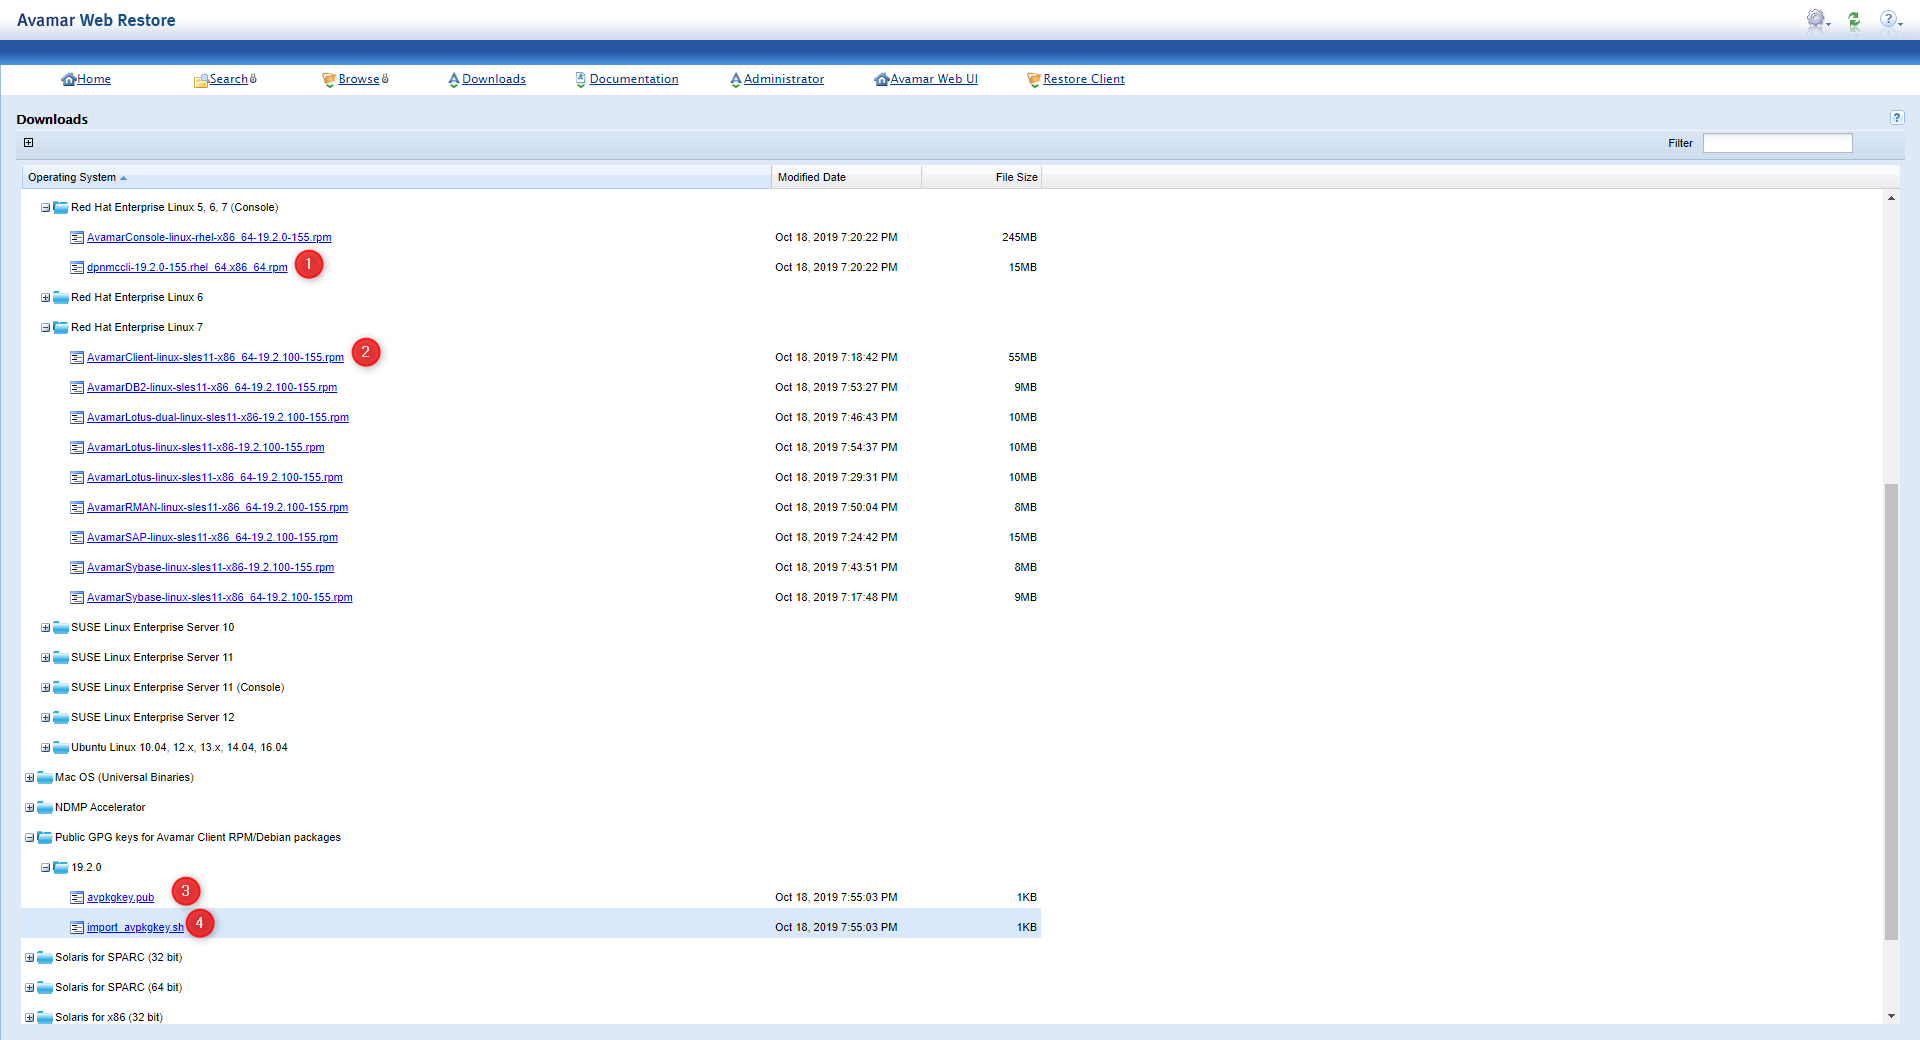
  1. Download the required software:

    • mccli

    • Avamar Linux Client

    • Pubkey (*.pub + sh)

You can obtain the above by browsing the downloads section of your Avamar server installation, provided you have installed 'UpgradeClientDownloads" from the EMC repository to the Avamar server. When in doubt, consult the Avamar documentation.
  1. Import the GPG key by invoking the script:

sh import_avpkgkey.sh
  1. Run avregister and fill in the required info.

# /usr/local/avamar/bin/avregister

=== Client Registration and Activation
This script will register and activate the client with the Administrator server.

Enter the Administrator server address (DNS text name or numeric IP address, DNS name preferred): <your_Avamar_server_address>

Enter the Avamar server domain [clients]:
avagent.d Info: Stopping Avamar Client Agent (avagent)...
avagent.d Info: Client Agent stopped.                      [  OK  ]
avagent Info <5008>: Logging to /usr/local/avamar/var/avagent.log
avagent.d Info: Client activated successfully.             [  OK  ]
avagent.d Info: Client Agent service started in systemd    [  OK  ]
avagent Info <5008>: Logging to /usr/local/avamar/var/avagent.log
avagent Info <5417>: daemonized as process id 17479
avagent.d Info: Client Agent started.                      [  OK  ]
avagent.d Info: Stopping Avamar Client Agent (avagent)...
avagent.d Info: Client Agent stopped.                      [  OK  ]
Registration Complete.
  1. Install the Management Console Command Line Interface (mccli).

# rpm -Uvh --force dpnmccli-19.2.0-155.rhel_64.x86_64.rpm
Preparing...                          ################################# [100%]
Updating / installing...
  1:dpnmccli-19.2.0-155              ################################# [100%

Note: please change the RPM name to match the file downloaded from your Avamar installation.

  1. Run avsetup_mccli to configure the management console.

You need to point mccli to your JRE installation, fill in the connection details, and provide the admin username and password.

# /usr/local/avamar/19.2.0-155/bin/avsetup_mccli
setting linux default
ls: cannot access /usr/java/latest: No such file or directory
Enter the location of your JRE (1.8) installation []: /usr/lib/jvm/java-1.8.0-openjdk-1.8.0.242.b08-0.el7_7.x86_64/jre
Enter the root directory of your Avamar installation [/usr/local/avamar/19.2.0-155]:
Enter the user data directory of your Avamar installation [~/.avamardata/19.2.0-155/var]:

Configuring default local mcsprofile in /usr/local/avamar/19.2.0-155/lib/mcclimcs.xml

Enter default mcs host name (mcsaddr) [localhost]: 
Enter default mcs port number on localhost (mcsport) [7778]:
Enter default userid on localhost (mcsuserid) [MCUser]: root
Enter password for root (mcspasswd): adminuserpass

       Avamar CLI 19.2.0 has been configured correctly
       Type mccli command to use it

Quickly test the correctness of this config by typing in:

# /usr/local/avamar/19.2.0-155/bin/mccli activity show

If the output shows the latest activity on Avamar, everything is OK.

Otherwise, check your config and/or Avamar documentation,

  1. Use the avregister command to register the backup client.

  2. Use avsetup_mccli to set up the client.

    • When choosing JRE - do NOT use /usr/java/latest but /usr/java/jre1.8...

  3. Proceed with the configuration and add a backup destination.

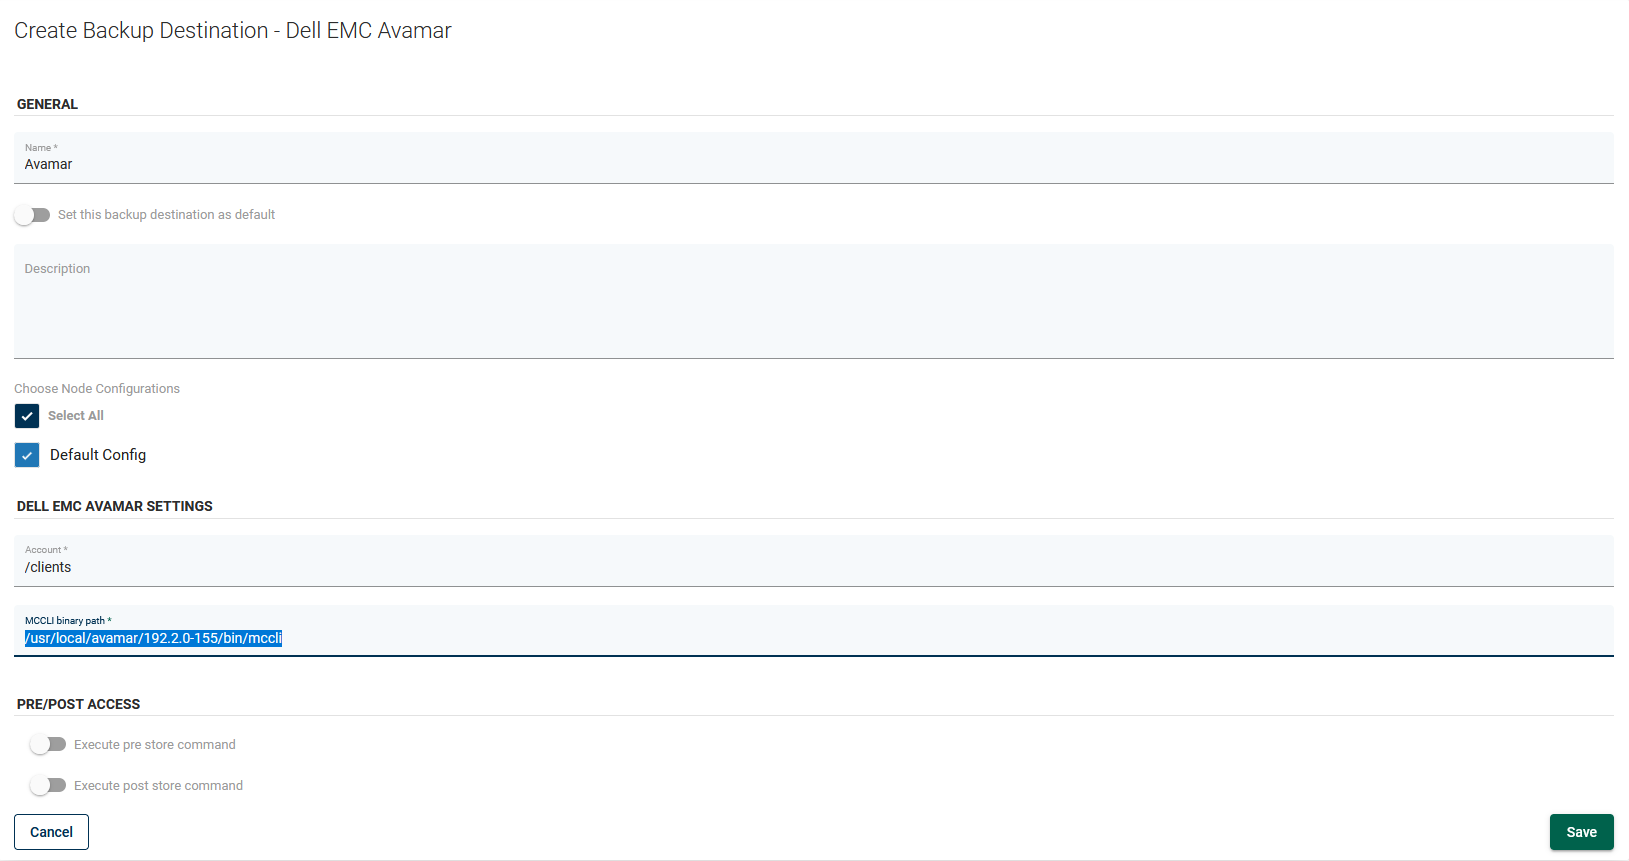
On the left side menu, click on Backup Destinations, then change to the enterprise sub-tab, click on the Create Backup Destination button and choose:

Fill in the required info. It may look similar to the example below:
Install avtar - - page 16.

Install mccli - - page 18.

https://www.dellemc.com/en-us/collaterals/unauth/technical-guides-support-information/products/data-protection/docu91839.pdf
https://www.dellemc.com/en-us/collaterals/unauth/quick-reference-guides/products/data-protection/docu91838.pdf