Backup and Recovery
Backup and Recovery 7.1
  • Storware Backup & Recovery documentation
    • Table of Contents
  • Changelog
  • Overview
    • Main Features
    • Storware Backup and Recovery concepts
      • Support Matrix
      • Architecture
      • Components
      • Backup types
      • Typical Scenarios
    • Licensing
    • Product Life Cycle
  • Deployment
    • Component requirements
    • Supported platforms requirements
    • Sizing Guide
      • Small
      • Medium
      • Large
    • Installation
      • ISO-based installation
      • Quick Installation using all-in-one script
      • Installation using Ansible playbook
      • Installation with RPMs
      • Deployment in Microsoft Azure
      • Virtual Appliance
        • RHV/oVirt/OLVM Virtual Appliance
        • Citrix Hypervisor | XCP-ng Virtual Appliance
        • VMware Virtual Appliance
        • Nutanix Acropolis Hypervisor (AHV)
    • Initial Configuration
    • Backup Destinations
      • File System
        • Synthetic File System
          • XFS
          • DD Boost
        • isoLayer (Synthetic)
        • File system
          • Virtual Data Optimizer (VDO)
        • Catalogic Software vStor
      • Deduplication Appliances
        • Dell EMC Data Domain
        • Huawei OceanProtect
        • HPE StoreOnce
        • Exagrid
        • Neverfail HybriStor
      • Object Storage
        • Alibaba Cloud OSS
        • AWS S3 or S3-compatible
        • Ceph Rados Gateway
        • Cloudian S3
        • Wasabi
        • Google Cloud Storage
        • IBM Cloud Object Storage
        • Microsoft Azure Blob Storage
        • Nutanix Objects
        • OpenStack SWIFT
        • Oracle Cloud Infrastructure Object Storage
        • Scality RING
      • Enterprise Backup Providers
        • Dell EMC Avamar
        • Dell EMC Networker
        • IBM Spectrum Protect
        • Micro Focus Data Protector
        • Veritas NetBackup
        • Rubrik Managed Volumes
      • Tape Pools
    • High Availability
      • 2 Node Cluster
      • 3 Node Cluster
    • Common tasks
      • Staging space configuration
      • Enabling HTTPS connectivity for nodes
      • LVM setup on Storware Backup & Recovery Node for disk attachment backup mode
      • Full versions of libvirt/qemu packages installation
      • SSH public key authentication
      • Enabling HTTP(S) Proxy for Storware Backup & Recovery
  • Protecting Virtual Environments
    • Virtual Machines
      • VMware vSphere/ESXi
      • Microsoft Hyper-V
      • Azure Stack HCI
      • Nutanix Acropolis Hypervisor (AHV)
      • Red Hat Openshift Virtualization
      • Red Hat Virtualization
      • oVirt
      • Oracle Linux Virtualization Manager
      • Oracle VM
      • Proxmox VE
      • KVM/Xen
      • OpenStack
      • OpenNebula
      • Virtuozzo
      • Verge
      • Citrix Hypervisor (XenServer)
      • XCP-ng
      • Huawei FusionCompute
      • HPE SimpliVity
      • SC//Platform
    • Cloud
      • Amazon EC2
      • GCP GCE
      • Azure Cloud
    • Containers
      • Kubernetes
      • Red Hat OpenShift
      • Proxmox VE
    • Backup & Restore
    • v2v migration
  • Protecting Microsoft 365
    • Microsoft 365 organization management
      • Configure Microsoft 365 access
      • Add Microsoft 365 organization manually
      • Add Microsoft 365 organization using the Setup Assistant
      • Account auto-synchronization
    • Backup & Restore
    • Suppoted Sharepoint templates, and limitations
  • File Level Backup and Restore - OS Agent
  • Protecting Applications
    • Applications
      • MSSQL
      • MySQL/MariaDB
      • PostgreSQL
      • DB2
      • Oracle
      • Relax and Recover - ReaR
      • Git
      • oVirt/RHV/OLVM
      • Kubernetes/OpenShift etcd
    • Backup & Restore
  • Protecting Storage Providers
    • Storage Providers
      • Ceph RBD
      • Nutanix Files
      • Nutanix Volume Groups
    • Backup & Restore
  • Administration
    • Dashboard
    • Virtual Environments
      • Instances
        • Backup on-demand
        • Restore on-demand
        • Snapshot Management
      • Virtualization Providers
      • Backup SLAs
        • Policies
        • Schedules
      • Snapshot SLAs
        • Policies
        • Schedules
      • Recovery Plans
        • Policies
        • Schedules
      • Mounted Backups (File-level Restore)
    • Storage
      • Instances
        • Backup on-demand
        • Restore on-demand
      • Infrastructure
      • Backup SLAs
        • Policies
        • Schedules
      • Snapshot SLAs
        • Policies
        • Schedules
      • Mounted Backups (File-level Restore)
    • Cloud
      • Instances
      • Service Providers
      • Backup SLAs
        • Policies
        • Schedules
      • Download
    • Applications
      • Instances
      • Execution Configurations
      • Backup SLAs
    • Endpoints
      • Environment
      • Administrators
      • Endpoints Server Management
        • Dashboard
        • Packages
        • Organizations
      • Endpoints Administrator
        • Dashboard
        • Users
          • Local users
          • LDAP users
        • Devices
          • Devices list view
          • Device status
        • Backup SLA
          • Create a Backup SLA
            • GENERAL
            • WINDOWS
            • MAC OS (technical preview)
            • EMAIL CLIENTS
          • Backup SLA management
          • Backup SLA removal
        • Restore Jobs
        • Client Deployments
    • Reporting
      • Virtual Environments
      • Storage
      • Microsoft 365
      • Applications
      • Notifications
      • Audit Log
    • Nodes
      • Instances
      • Node Configurations
    • Access Management
      • Users
      • Groups
      • Roles
      • OS Credentials
    • Settings
      • Global Settings
      • Internal DB Backup
      • Notification Rules
      • Mailing Lists
      • Endpoints Global Settings
    • Upgrade
    • CLI Reference
    • CLI v2 Reference
  • Integration
  • Integration Plugins
    • Red Hat Virtualization UI Plugin
    • oVirt UI Plugin
    • Oracle Linux Virtualization Manager UI Plugin
    • OpenStack UI Plugin
  • Troubleshooting
    • Enable DEBUG mode in Storware Backup and Recovery
    • Collecting logs
    • External log targets
    • Disaster Recovery
  • Known software issues and limitations
  • Glossary
Powered by GitBook
On this page
  • Create a new Backup Destination (Dell EMC Data Domain)
  • DD Boost FS Plugin
  • Microsoft Hyper-V
  1. Deployment
  2. Backup Destinations
  3. Deduplication Appliances

Dell EMC Data Domain

Create a new Backup Destination (Dell EMC Data Domain)

  • Go into the backup destination menu and click on Create a backup destination.

  • Provide a name and description for the new backup destination.

  • Specify the retention days for full and incremental backups.

  • Specify the retention versions for full and incremental backups.

  • Choose and assign the node configuration to which you want to attach the new backup destination.

  • Add to one or more storage paths.

    • example - /vprotect_data/backupdestination

  • Save the configuration.

DD Boost FS Plugin

  • To boost the backup process we recommend using a single Storage Unit and mtree, and subfolders on the BoostFS for multiple backup destinations (with possibly different retention settings).

    • No additional data copy is needed in the store phase if staging is using the same file system as the backup destination.

    • The Setup assumes a single Storage Unit and a single mtree for all backup destinations.

    • The staging space should always be a top directory, and all backup destinations should be defined as separate subfolders of this file system.

    • Storware Backup & Recovery handles retention, and each backup destination may have different retention configured.

    • A single Storage Unit will also affect replication as it has to cover all backup destinations, and may replicate temporary data from the staging space or mounted backups.

  • Sharing the same BoostFS across multiple nodes allows the administrator to create backups on one node (one host/environment) and restore using a different node (to a different host/environment).

    • UID/GID ownership and permissions must allow Storware Backup & Recovery to read/write contents of the BoostFS share.

    • To meet these requirements, the user and group named vprotect that was created during the installation process must have the same UID and GID on each Storware Backup & Recovery node machine. You can create this before installing Storware Backup & Recovery packages or change it after installation.

  • Data Domain User requirements:

    • user must have backup-operator management role

    • user must be assigned to DD Boost Storage Unit

Prepare your PowerProtect DD as a backup destination:

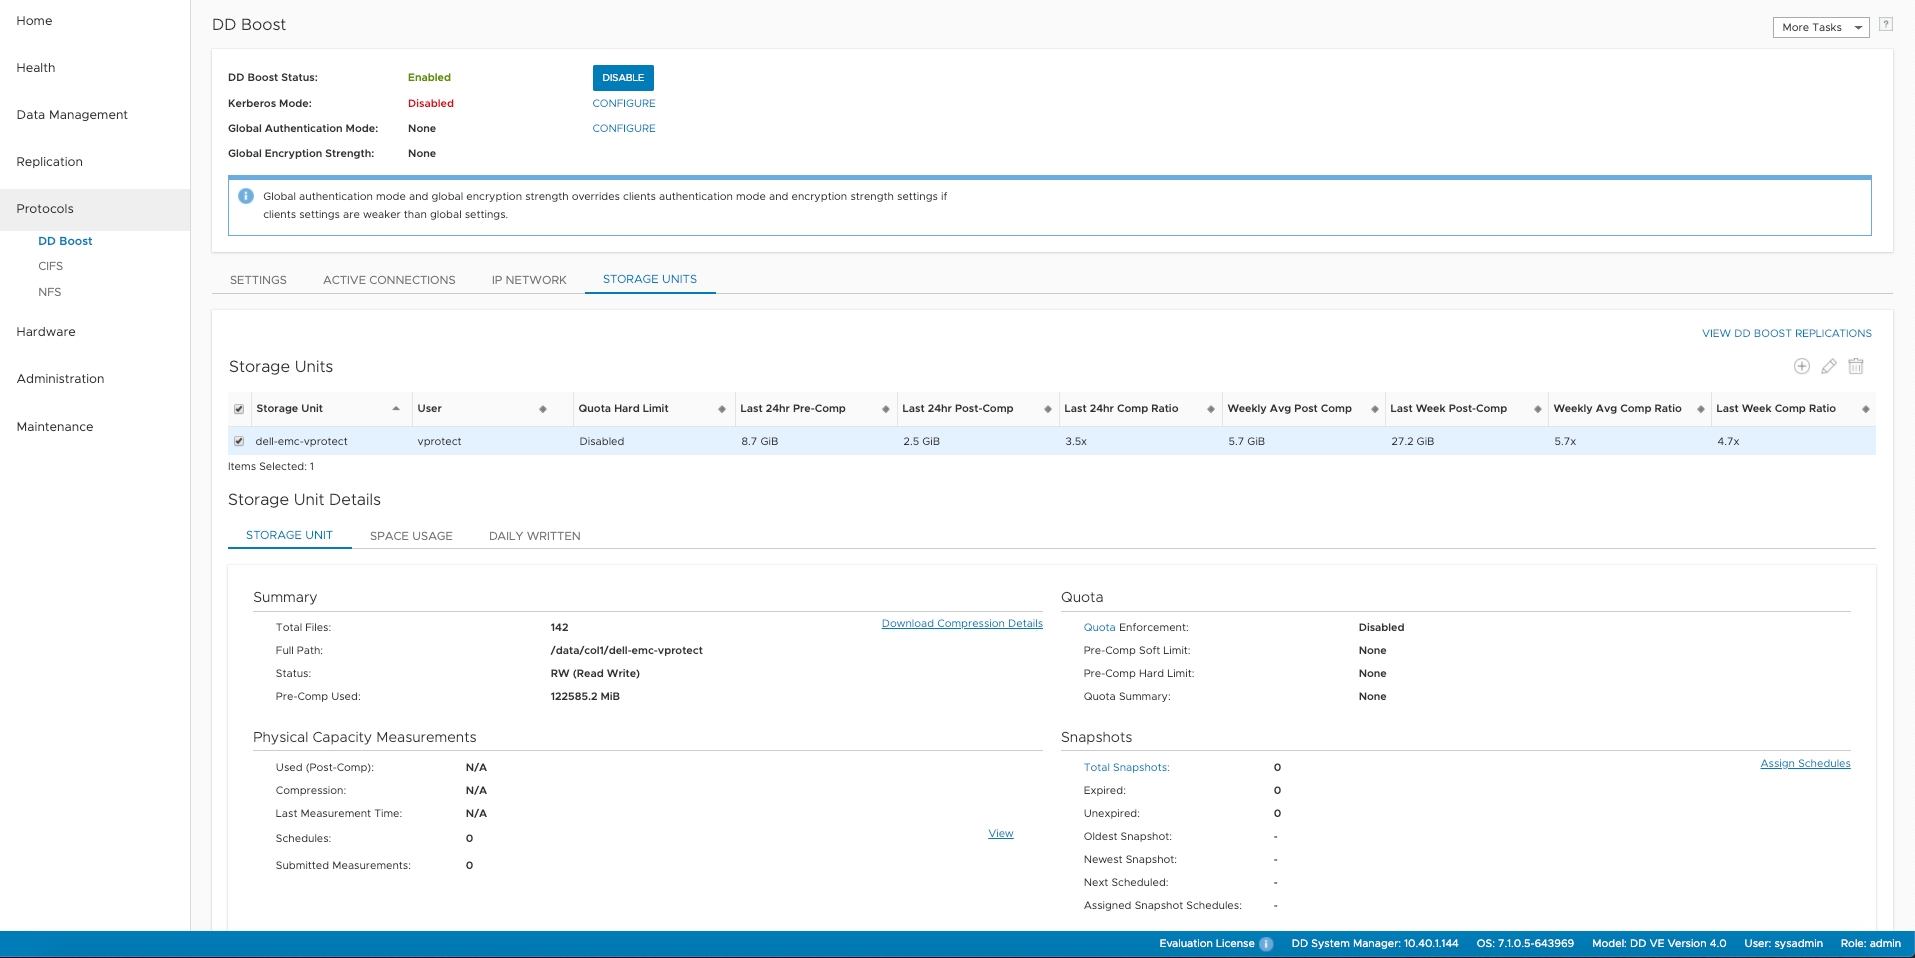
  • Login to PowerProtect DD and create an NFS Storage Unit called storware-vprotect
  • Download BoostFS RPM from the Dell EMC site.

  • Install BoostFS:

    rpm -ivh DDBoostFS-7.0.0.0-633922.rhel.x86_64.rpm
  • Save the password for BoostFS.

    # Syntax
    /opt/emc/boostfs/bin/boostfs lockbox set -d [DataDomain_IP_OR_DNS_NAME] -u [Access_User_Name] -s [Storage_Area_Name]
    # Example
    /opt/emc/boostfs/bin/boostfs lockbox set -d 10.1.10.100 -u vprotect -s vprotectbackup
  • Add the /etc/fstab entry:

    # Syntax
    [DataDomain_IP_OR_DNS_NAME]:/[Storage_Area_Name] /[Mount_Point] boostfs defaults,_netdev,bfsopt(allow-others=true) 0 0
    # Example
    10.1.10.100:/vprotectbackup /vprotect_data boostfs defaults,_netdev,bfsopt(allow-others=true) 0 0
  • Mount the fstab entry:

    mount -a
  • For a manual, one-time mount you can run this command:

    # Syntax
    /opt/emc/boostfs/bin/boostfs mount -o allow-others=true -d [DataDomain_IP_OR_DNS_NAME] -s [Storage_Area_Name] /[Mount_Point]
    # Example
    /opt/emc/boostfs/bin/boostfs mount -o allow-others=true -d 10.1.10.100 -s vprotectbackup /vprotect_data
  • Confirm with df -h that your /vprotect_data is mounted Note: Remember to specify the backup destination path as a subdirectory of /vprotect_data if you would like to use the same storage unit as a staging space and backup destination - for example: /vprotect_data/my-backups.

    mkdir /vprotect_data/my-backups
  • Set ownership to the vprotect user on the directory /vprotect_data.

    chown vprotect -R /vprotect_data
  • Set ownership to the vprotect user and data domain group on the directory /vprotect_data/my-backups.

    chown vprotect:gid /vprotect_data/my-backups

where 'gid' is the GID of data domain user specified in Synthetic DD Boost backup destination configuration.

  • Set read and write privileges for both user and group to the directory /vprotect_data/my-backups.

    chmod 0775 /vprotect_data/my-backups

Note: Synthetic DD Boost

Microsoft Hyper-V

Additional actions are required when protecting Microsoft Hyper-V. Mounting the Data Domain share should be done in the same way as described above. After mounting the share, do the following:

  • Log in to your Data Domain and check UID of the user that is used to connect to Storware Backup & Recovery

    sysadmin@localhost# user show list
    
    User list from node "localhost".
    Name        Uid   Role              Last Login From   Last Login Time            Status    Disable Date
    ---------   ---   ---------------   ---------------   ------------------------   -------   ------------                   enabled   never
    vprotect   501   admin             <unknown>         never                      enabled   never
    --
  • Log in to Storware Backup & Recovery Node and set the vprotect user ID to the same as the DataDomain user. If there are multiple nodes, the ID must be changed on each of them.

    • First, make sure that no other user has this ID

      grep ":YOUR_UID:" /etc/passwd
    • If the command returns a result, it means that this UID is taken, for example:

      [root@localhost ~]# grep ":501:" /etc/passwd
      user:x:0:0:user:/user:/bin/bash
    • In this case, the ID of that user should be changed to another first, and only then ID of the vprotect user can be changed.

      If this command returns no results, it means that this ID is not taken and it is possible to change the vprotect user ID

      # Stop vprotect services
      systemctl stop vprotect-server vprotect-node
      
      # Change vprotect user and group ID
      usermod -u 501 vprotect
      groupmod -g 501 vprotect
  • Reload permissions

    chown vprotect:vprotect -R /opt/vprotect/
    chown vprotect:vprotect -R /tmp
    chown vprotect:vprotect -R /mnt/vprotect/
    chown vprotect:vprotect -R /vprotect_data/
    # If you use a path other than /vprotect_data for staging space / backup destination, change the permissions for it as well.
    # Start vprotect services
    systemctl start vprotect-server vprotect-node
PreviousDeduplication AppliancesNextHuawei OceanProtect

To configure a synthetic backup destination, follow the instructions that are described in the .

documentation
PowerProtect DD - login screen
DD Boost - storage units