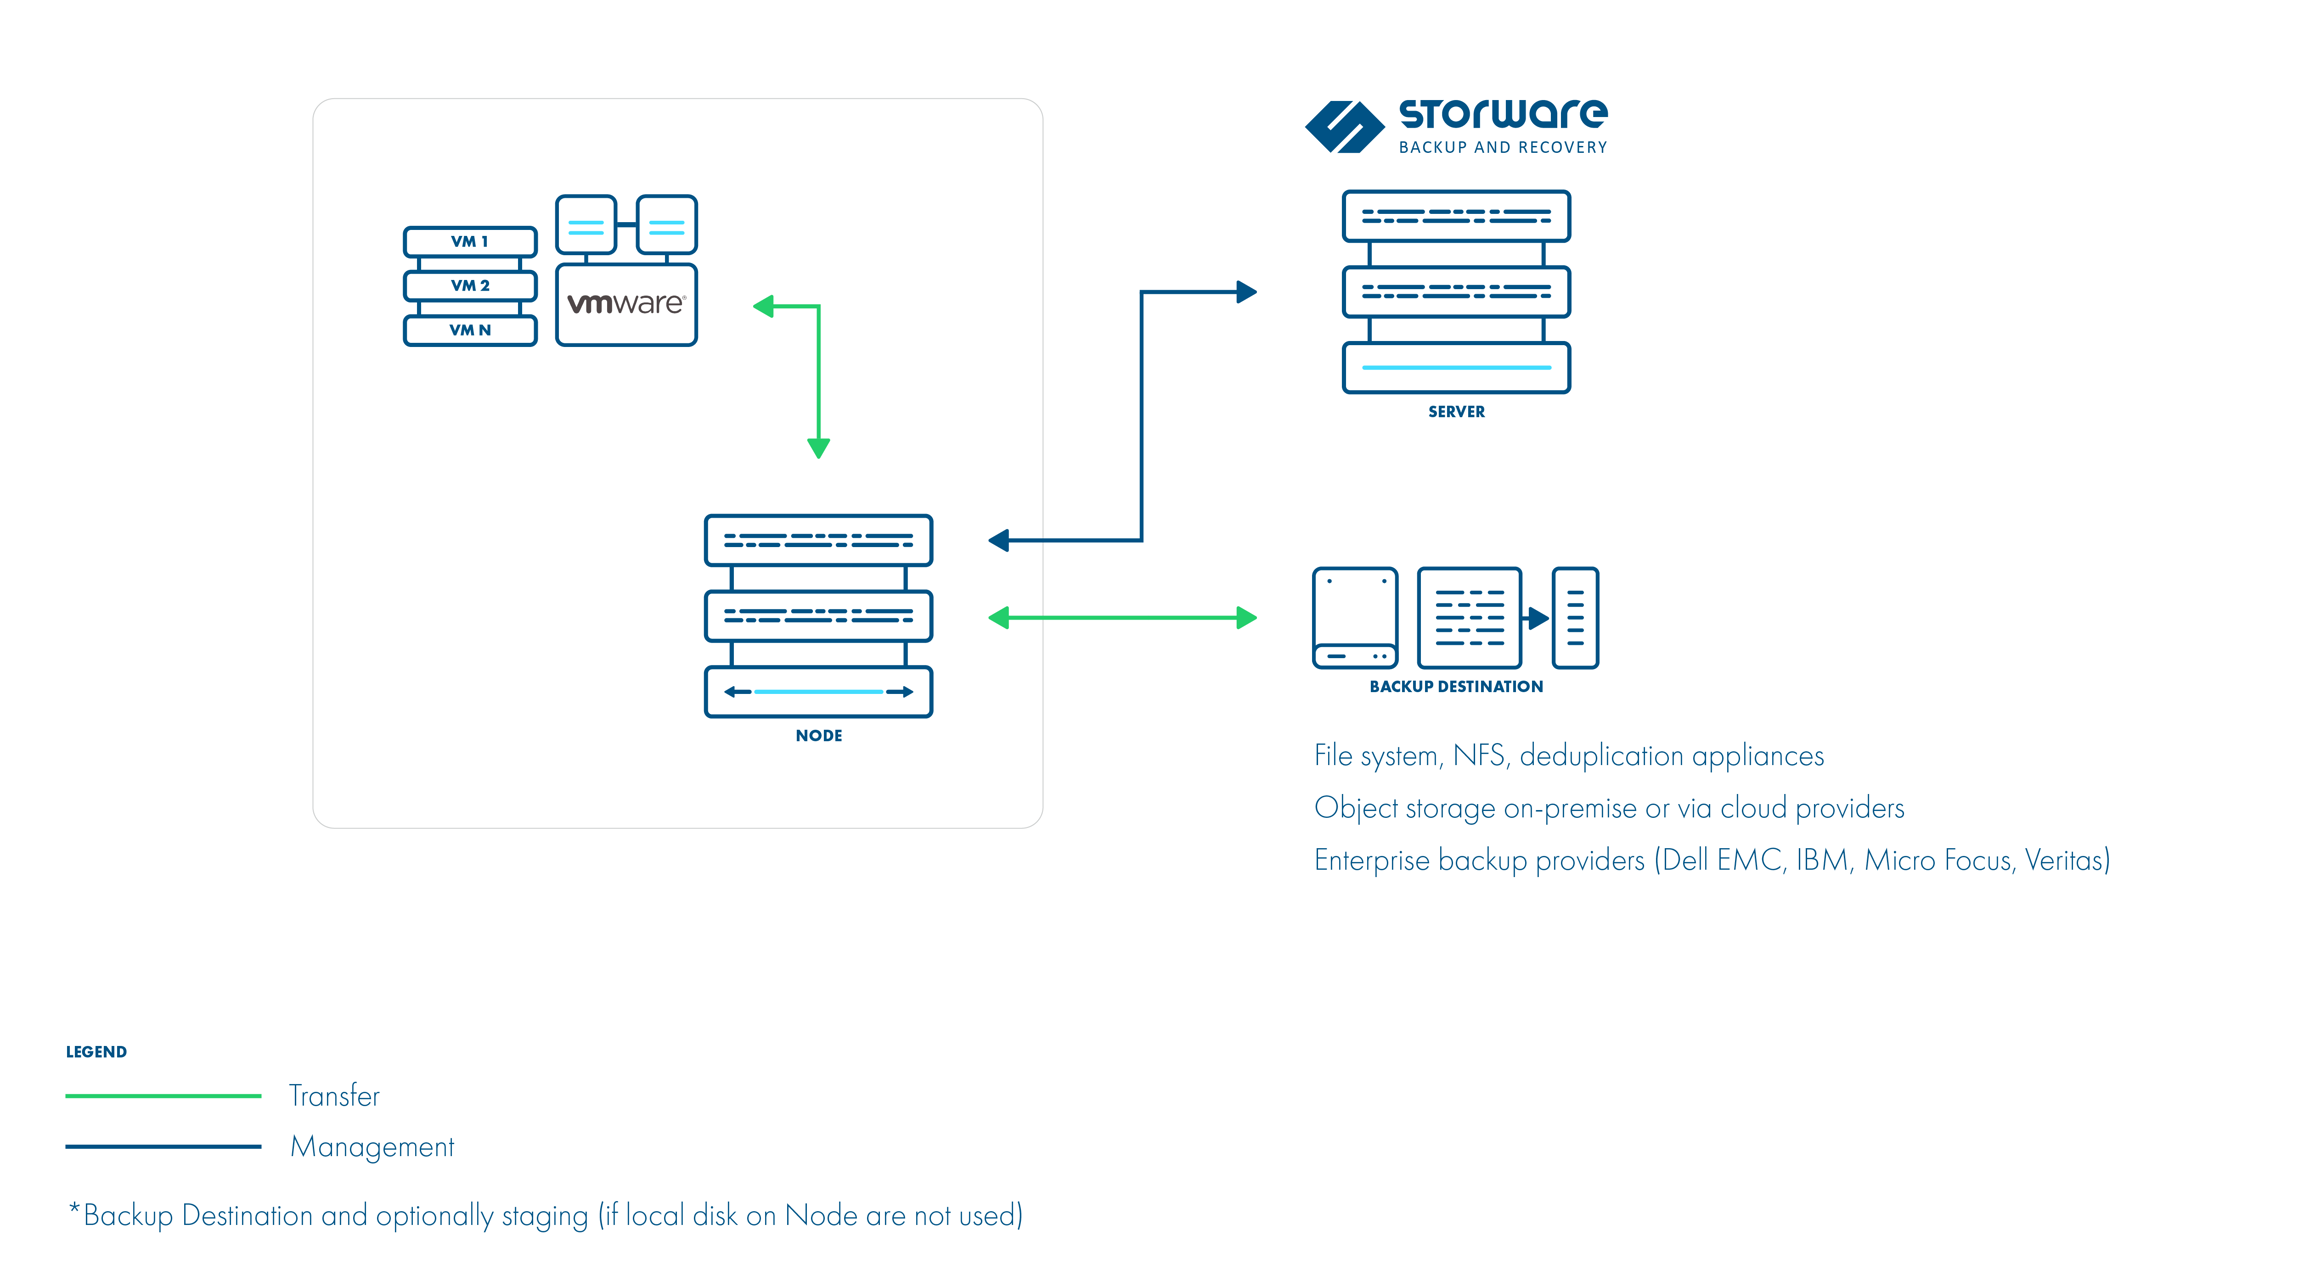
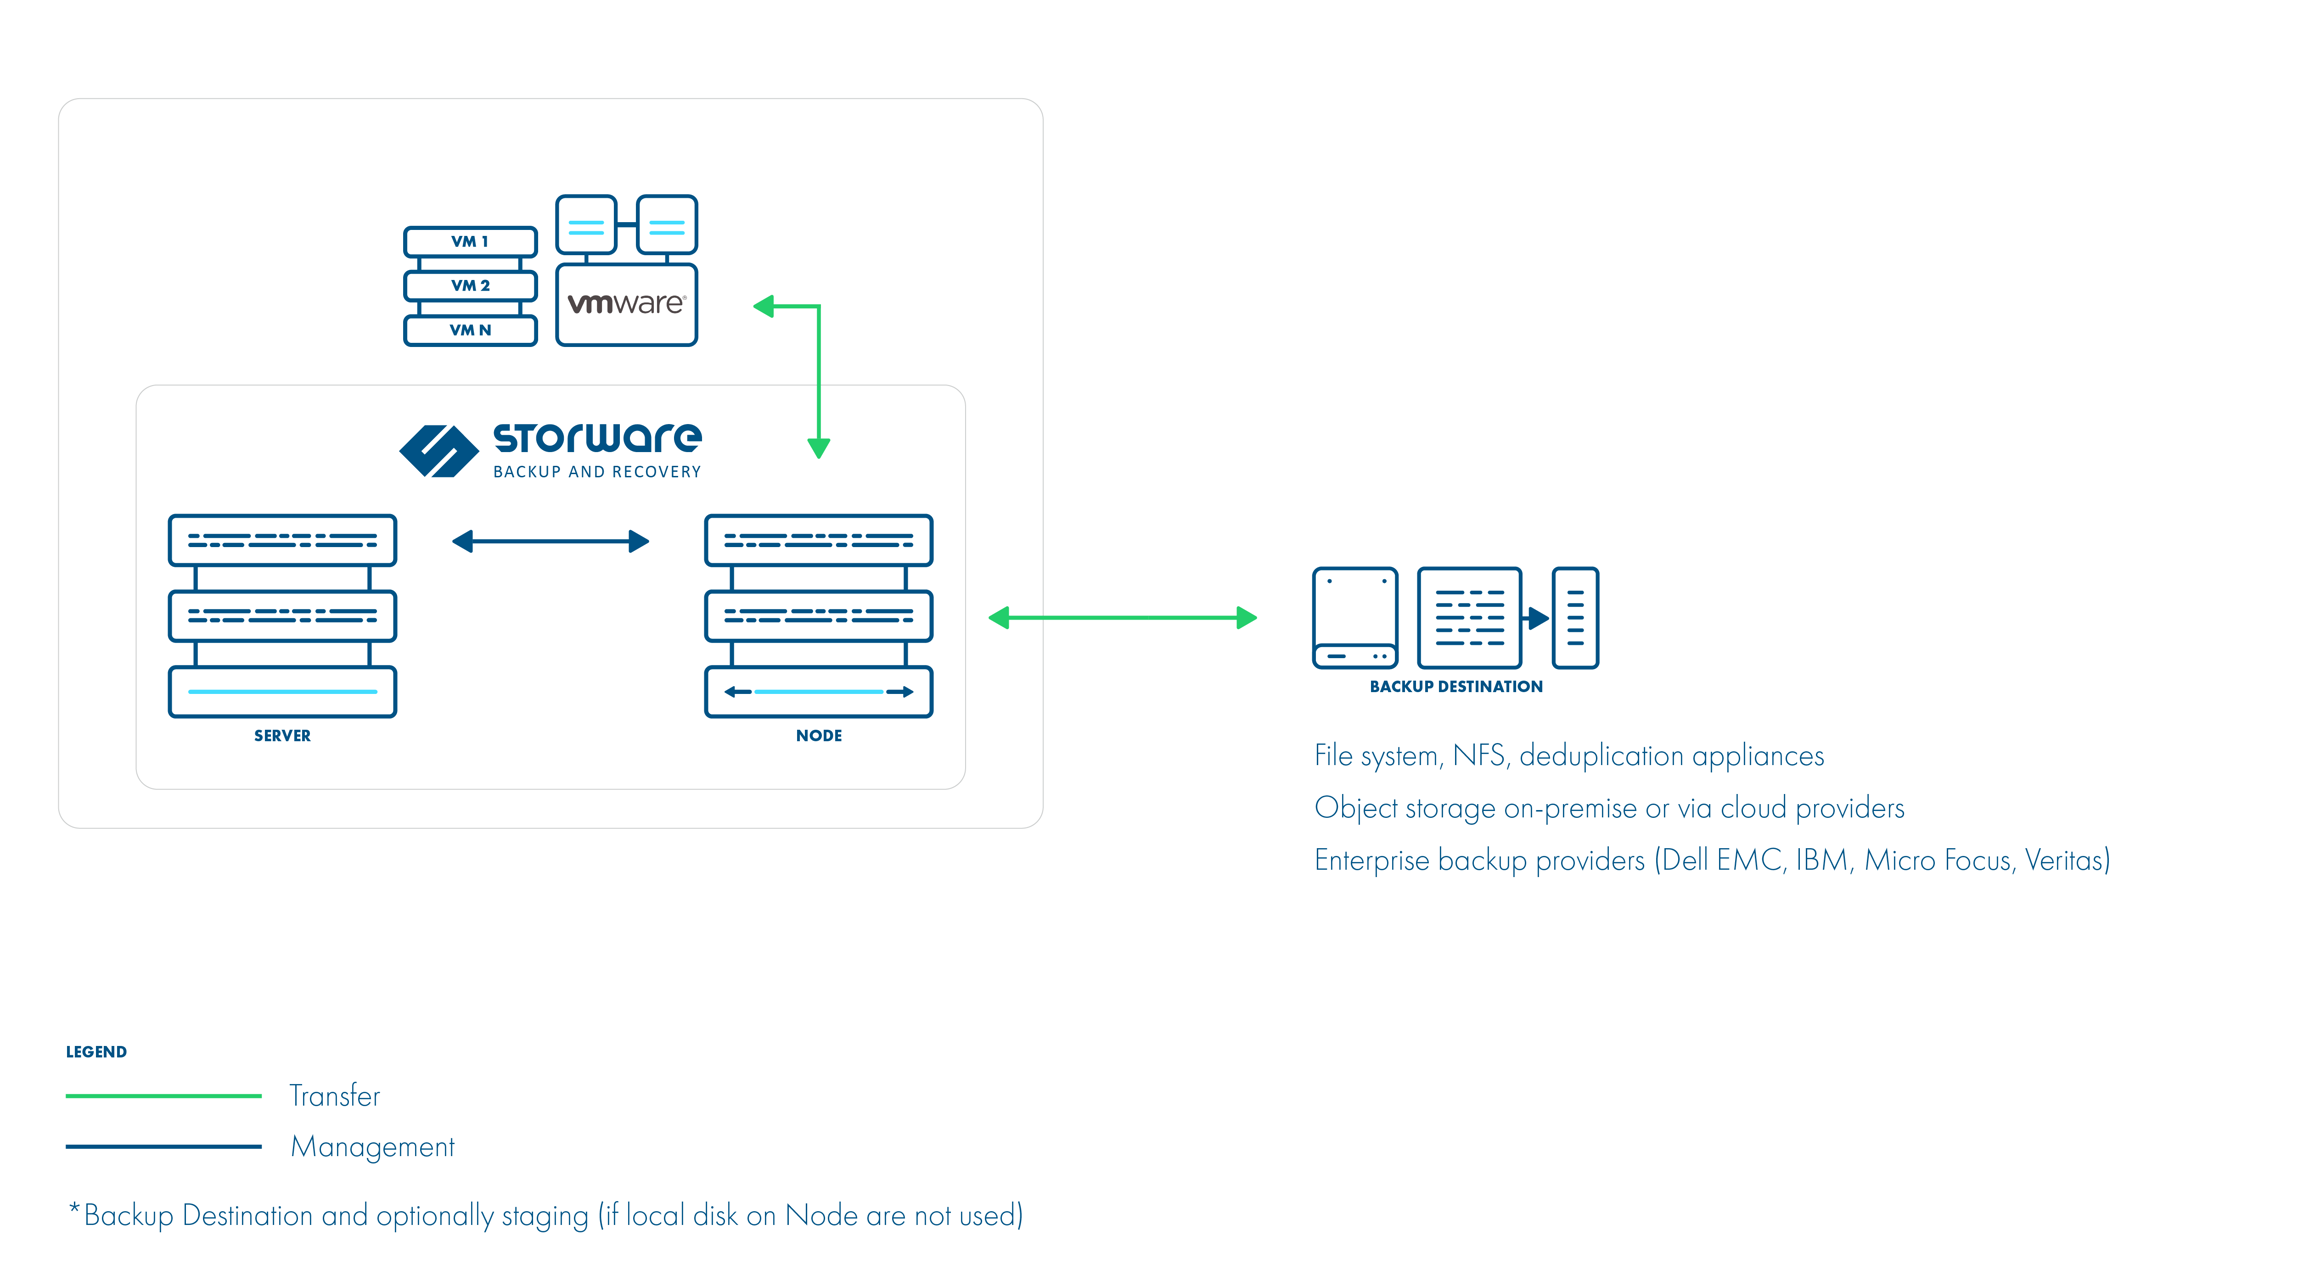
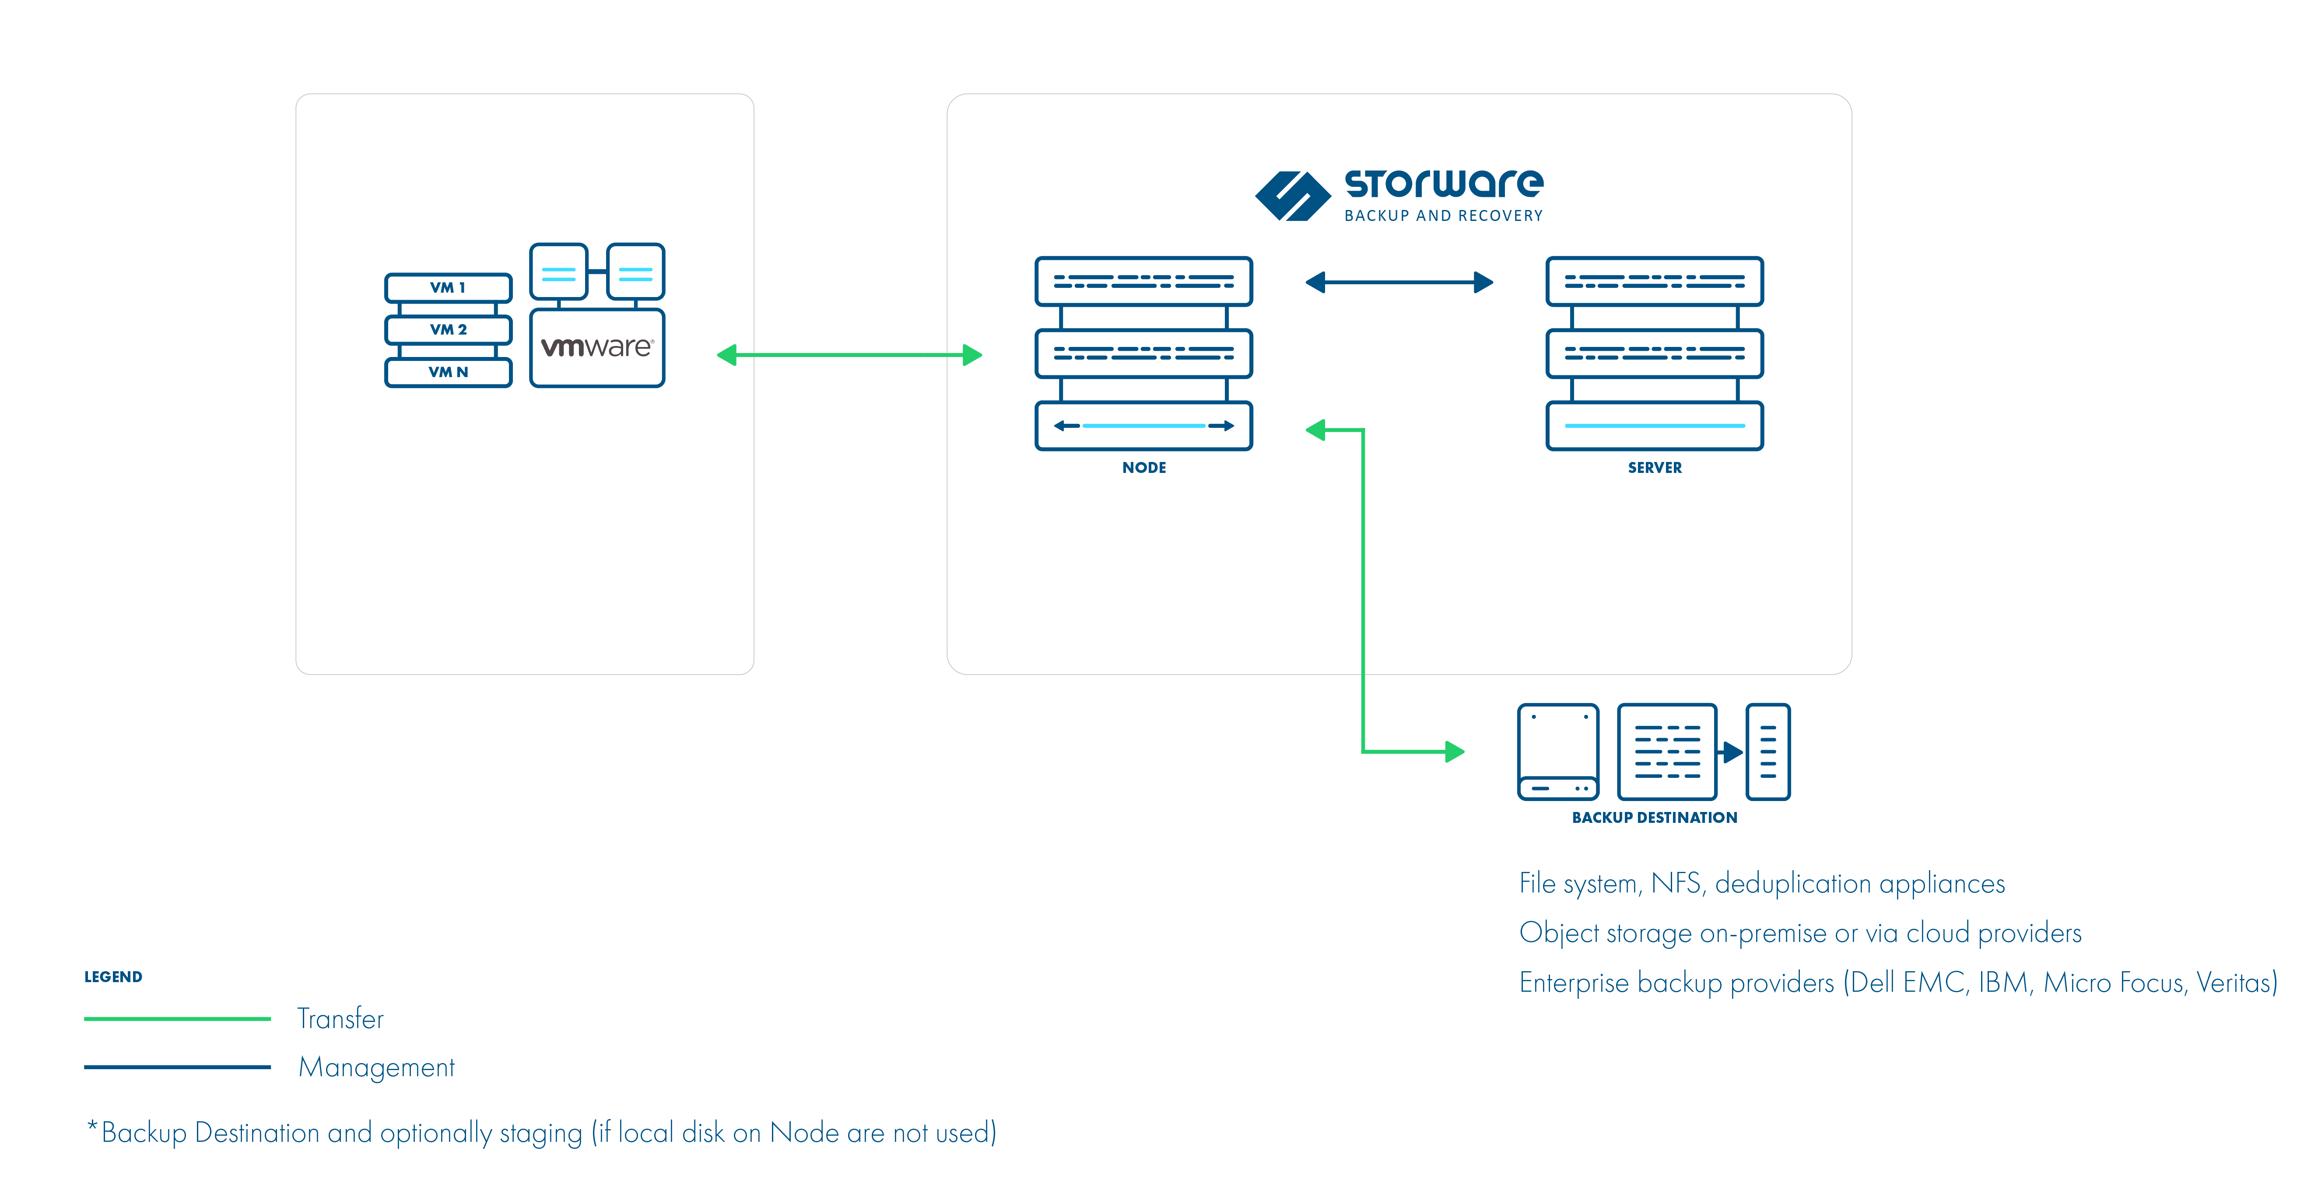
VMware vSphere/ESXi
This chapter provides guidance on integrating and managing VMware environments within Storware Backup and Recovery.
Overview
Storware supports agentless backup and recovery operations for VMware virtual machines through seamless integration with VMware vSphere, vCenter, and ESXi hosts.
Storware enables full and incremental backups, efficient data protection policies, and flexible restore options—including full VM recovery, disk-level restore, and instant access features. By leveraging VMware’s native APIs (vStorage APIs for Data Protection - VADP), Storware ensures consistent and reliable backup operations without requiring agent.
Changed Block Tracking (CBT) in VMware
Changed Block Tracking (CBT) is a VMware vSphere feature that enables efficient incremental backups by tracking only the blocks of data that have changed since the last backup operation. Storware Backup and Recovery leverages CBT through VMware’s VADP (vStorage APIs for Data Protection) to significantly improve backup performance and reduce resource usage.
How CBT Works
When CBT is enabled for a virtual machine, the VMware hypervisor keeps track of changed disk sectors in a change tracking file. During an incremental backup, only those modified blocks are read and transferred to the backup storage, rather than scanning the entire virtual disk.
This approach allows for:
Faster incremental backups
Reduced network and storage I/O
More frequent backup scheduling with minimal impact on performance
Requirements for CBT
To use CBT with Storware Backup and Recovery, the following conditions must be met:
The VM must be hardware version 7 or later
The VM must be using a supported virtual disk format (e.g., not independent disks)
The VM must reside on a VMFS or NFS datastore
CBT must be explicitly enabled for the VM
Enabling CBT
Storware Backup and Recovery will automatically detect and use CBT if it is enabled on the VM. However, you can manually verify or enable it using the following methods:
Via vSphere Web Client:
Power off the virtual machine.
Edit VM settings and add the following parameter in the Configuration Parameters section:
Power on the VM.
Via PowerCLI:
Automatic CBT Reset on Full Backup
Storware automatically resets CBT during full backup operations to maintain consistency and prevent data mismatch. This ensures that subsequent incremental backups are based on a reliable change baseline.
Backup strategies
VMware Transport Modes: Hot-Add and NBD
When performing backups using vSphere APIs for Data Protection (VADP), VMware supports multiple transport modes to access virtual disk data. Storware Backup and Recovery automatically selects the most efficient method available, depending on the environment. The two supported modes are Hot-Add and NBD.
Hot-Add Mode
Hot-Add is a transport mode where the backup proxy (or backup node) attaches the virtual disks of the target VM to itself as if they were local disks.
How It Works:
The proxy VM (Storware node) must reside on the same ESXi host as the target VM or have access via vCenter.
During the backup, the target VM's virtual disks are hot-added to the proxy VM.
This allows high-speed, LAN-free backup directly through the ESXi I/O stack.
Requirements:
The proxy must be a VM.
The proxy and target VM must share a datastore and be managed by the same vCenter Server.
VMware Tools are not required, but VM hardware compatibility and permissions must allow disk attach/detach.
Pros:
Very fast and efficient
LAN-free: no network overhead
Ideal for large VMs or high-throughput environments
Cons:
Slightly more complex setup
Proxy and VM must share datastore visibility


NBD (Network Block Device) Mode
NBD uses the management network to read virtual disk data over TCP/IP, typically through the vCenter or ESXi host.
How It Works:
The proxy connects to the ESXi host over the management network.
Virtual disk data is transferred block-by-block using VMware’s proprietary NBD protocol.
Pros:
Simple to configure
No special storage access or proxy placement required
Works across different datastores and hosts
Cons:
Slower than Hot-Add, especially for large VMs
Network load can affect backup speed
Dependent on bandwidth and latency of the management network

When to Use Each
Hot-Add
Proxy VM shares datastore visibility with target VMs and high performance is needed
NBD
Simpler setup is preferred or Hot-Add is not available
Storware Backup and Recovery will typically attempt Hot-Add first (if supported), then fall back to NBD as needed.
Supported features
Supported versions
7.0, 8.0
7.0, 8.0
The last snapshot is kept on the hypervisor for incremental backups
No
No
Access to hypervisor OS required
No
No
Proxy VM required
Yes
No
Full backup
Supported
Supported
Incremental backup
Supported
Supported
Synthetic backups
Supported
Supported
Cross-restore (V2V)
Supported (to OpenStack)
Supported (to OpenStack)
File-level restore
Supported
Supported
VM disk exclusion
Supported
Supported
Quiesced snapshots
Supported
Supported
Snapshots management
Supported
Supported
Pre/post command execution
Supported
Supported
Access to VM disk backup over iSCSI
Supported
Supported
VM name-based policy assignment
Supported
Supported
VM tag-based policy assignment
Supported
Supported
Power-on VM after restore
Supported
Supported
Network requirements
Connection URL: https://VCENTER_HOST or https://ESXI_HOST
Node
VMware vCenter/ESXi
443/tcp
API access
Node
VMware ESXi
902/tcp
HotAdd/NBD
Node
VMware vCenter/ESXi
445/tcp
Instant Restore (NFS)
Protecting VMware
To integrate VMware environments with Storware Backup and Recovery, you can add either a standalone VMware ESXi host or a VMware vCenter Server for centralized management.
Adding VMware provider
Log in to the Storware Backup & Recovery WebUI.
Navigate to: Virtual Environments → Virtualization Providers.
Click the Create button to open the Add new Virtualization Provider.
Select VMware ESXi or VMware vCenter Server from the drop down menu.
Fill in the Required Fields
Node Config Select the node configuration used during communication with the Hyper-V.
Host Enter the IP address or hostname of the VMware ESXi or VMware vCenter server address in URL format.
Username The login name of a VMware user account with access to the vCenter Server or ESXi host.
Password The corresponding password for the specified VMware user account.
Trust Cerificates Enables or disables certificate validation for secure connections - when enabled, system will verify that the remote system presents a trusted SSL/TLS certificate.
Restoring VMware virtual machines
Storware Backup and Recovery provides flexible restore options for VMware virtual machines (VMs). Depending on your recovery needs, you can restore an entire virtual machine or individual virtual disks.
Restore operations are performed directly from the Storware WebUI, with the ability to restore to the original location or to an alternate ESXi host or datastore. This allows for both full system recovery and granular restore scenarios in VMware-based environments.
Types of Restore Operations
Restore to virtualization manager Restores the virtual machine directly to the vCenter Server or standalone ESXi host. This method recreates the VM in the virtual environment, preserving its original configuration and metadata. It also allows you to selectively restore individual virtual disks if full VM recovery is not required.
Restore to the node Exports the VM or selected virtual disks to the local filesystem of the Storware node or a specified directory. This method is typically used for manual recovery, migration purposes, or advanced troubleshooting scenarios.
Instant restore Mounts the backup image directly from backup storage, allowing the VM to become operational almost immediately—without waiting for full data transfer. This minimizes downtime for critical systems. The Live Storage Migration feature can be used after boot to transfer the VM’s data to production storage in the background, completing the recovery seamlessly
Migration (v2v) This functionality enables direct restoration of VMware virtual machine backups to OpenStack, eliminating the need for intermediary conversion tools or manual intervention. More information about v2v migration here.
Restore to virtualization manager
Log in to the Storware Backup & Recovery WebUI.
Navigate to: Virtual Environments → Instances
Locate the VM you wish to restore.
From the Action menu, select Restore, or click the VM name to open its details and choose Restore from the top menu of the detailed view.
Select Restore to virtualization manager
In the Restore Wizard, configure the following:
General
Select backup location Select the specific backup instance from which the virtual machine will be restored.
Virtualization Provider Specify the target hypervisor or virtualization manager where the VM should be restored.
Change name of the restored virtual environment Enable this option to assign a custom name to the restored VM; disable it to retain the original name.
Storage For each virtual disk, you can configure the following restore options:
Disk allocation format Choose the disk provisioning type for the restored virtual disk:
Thin Provision – Allocates storage on demand; disk space is used only as data is written.
Thick Provision Lazy Zeroed – Allocates the full disk size at creation, but zeroes out blocks only when they are first written.
Thick Provision Eager Zeroed – Allocates and zeroes out the entire disk space at creation; offers better performance for certain workloads like databases
Import to storage Define the target storage on the VMWare where the virtual disk will be restored.
Disk Name Disk filename after the restore operation.
Exclude Enable this option to exclude the selected disk from the restore operation. Useful when partial disk recovery is required.
Networking Choose the virtual switch or network to which the restored virtual machine will be connected.
Advanced
Delete if virtual machine already exist Automatically removes the existing VM with the same name before restoring.
Power on VM after restore Starts the restored virtual machine immediately after the restore process completes.
Fail task if restored VM cannot be powered on. Marks the restore task as failed if the virtual machine fails to start after restoration.
Review the summary
Click Restore
Restore to the node
Log in to the Storware Backup & Recovery WebUI.
Navigate to: Virtual Environments → Instances
Locate the VM you wish to restore.
From the Action menu, select Restore, or click the VM name to open its details and choose Restore from the top menu of the detailed view.
Select Restore to the node
In the Restore windows configure the following:
Select backup location Select the specific backup instance from which the virtual machine will be restored.
Choose node Select the Storware node where the restored data will be saved.
Choose restore path Specify the destination directory on the selected node for the restored files.
Restore only selected files Enable this option to browse and restore specific virtual disk or metadata files, rather than restoring the entire virtual machine.
Click Restore
Instant Restore
The Instant Restore feature in Storware Backup and Recovery allows you to quickly recover a VMware virtual machine by running it directly from the backup storage, significantly reducing recovery time for critical workloads.
Instant Restore requires that the backup destination used for the VM is a synthetic type.
How It Works
Storware creates an NFS share on the backup node where the VM backup is stored.
This share is automatically mounted to the vCenter Server as a temporary datastore.
A new virtual machine is created on the vCenter, and the backed-up virtual disks are attached to it from the mounted datastore.
The virtual machine is powered on and becomes accessible within moments.
Storage Live Migration (Storage vMotion)
Storware supports Live Storage Migration as part of the Instant Restore workflow.
When enabled, this option automatically triggers disk migration from the temporary NFS datastore (used during Instant Restore) to the selected production datastore after the VM is restored and powered on.
This ensures the VM continues running without interruption, while its storage is seamlessly moved to its final location in the background.
Enabling Live Migration is highly recommended for production recovery scenarios where performance and long-term storage reliability are required.
Restore
Log in to the Storware Backup & Recovery WebUI.
Navigate to: Virtual Environments → Instances
Locate the VM you wish to restore.
From the Action menu, select Restore, or click the VM name to open its details and choose Restore from the top menu of the detailed view.
Select Instant Restore
In the Instant Restore Wizard, configure the following:
General
Select backup location Select the specific backup instance from which the virtual machine will be restored.
Change name of the restored virtual environment Enable this option to assign a custom name to the restored VM; disable it to retain the original name.
Storage
Networking Choose the virtual switch or network to which the restored virtual machine will be connected.
Advanced
Review the summary
Click Restore
Last updated